![]()
![]()
![]()
![]()
![]()
- Beelance
- How to build
- How to install
- How to use
- Developer guide
- Contact
- Sponsors and partners
- Related projects, guides and articles
Beelance
Overview
Beelance comes from the French word “Balance” which means “weight scale”.
Beelance is an autonomous and remotely connected weight scale for beehives 🐝. It can monitor the weight and temperature of beehives and send the data to a remote server or a Google Sheet (through IFTTT or alternative). Beelance supports 2 types of communication:
- either specific frequencies optimized for IoT devices (long-range, low bandwidth), called LTE-M and NB-IoT (especially useful for remote areas)
- or normal cellular phone frequencies with a normal SIM card using LTE / 4G
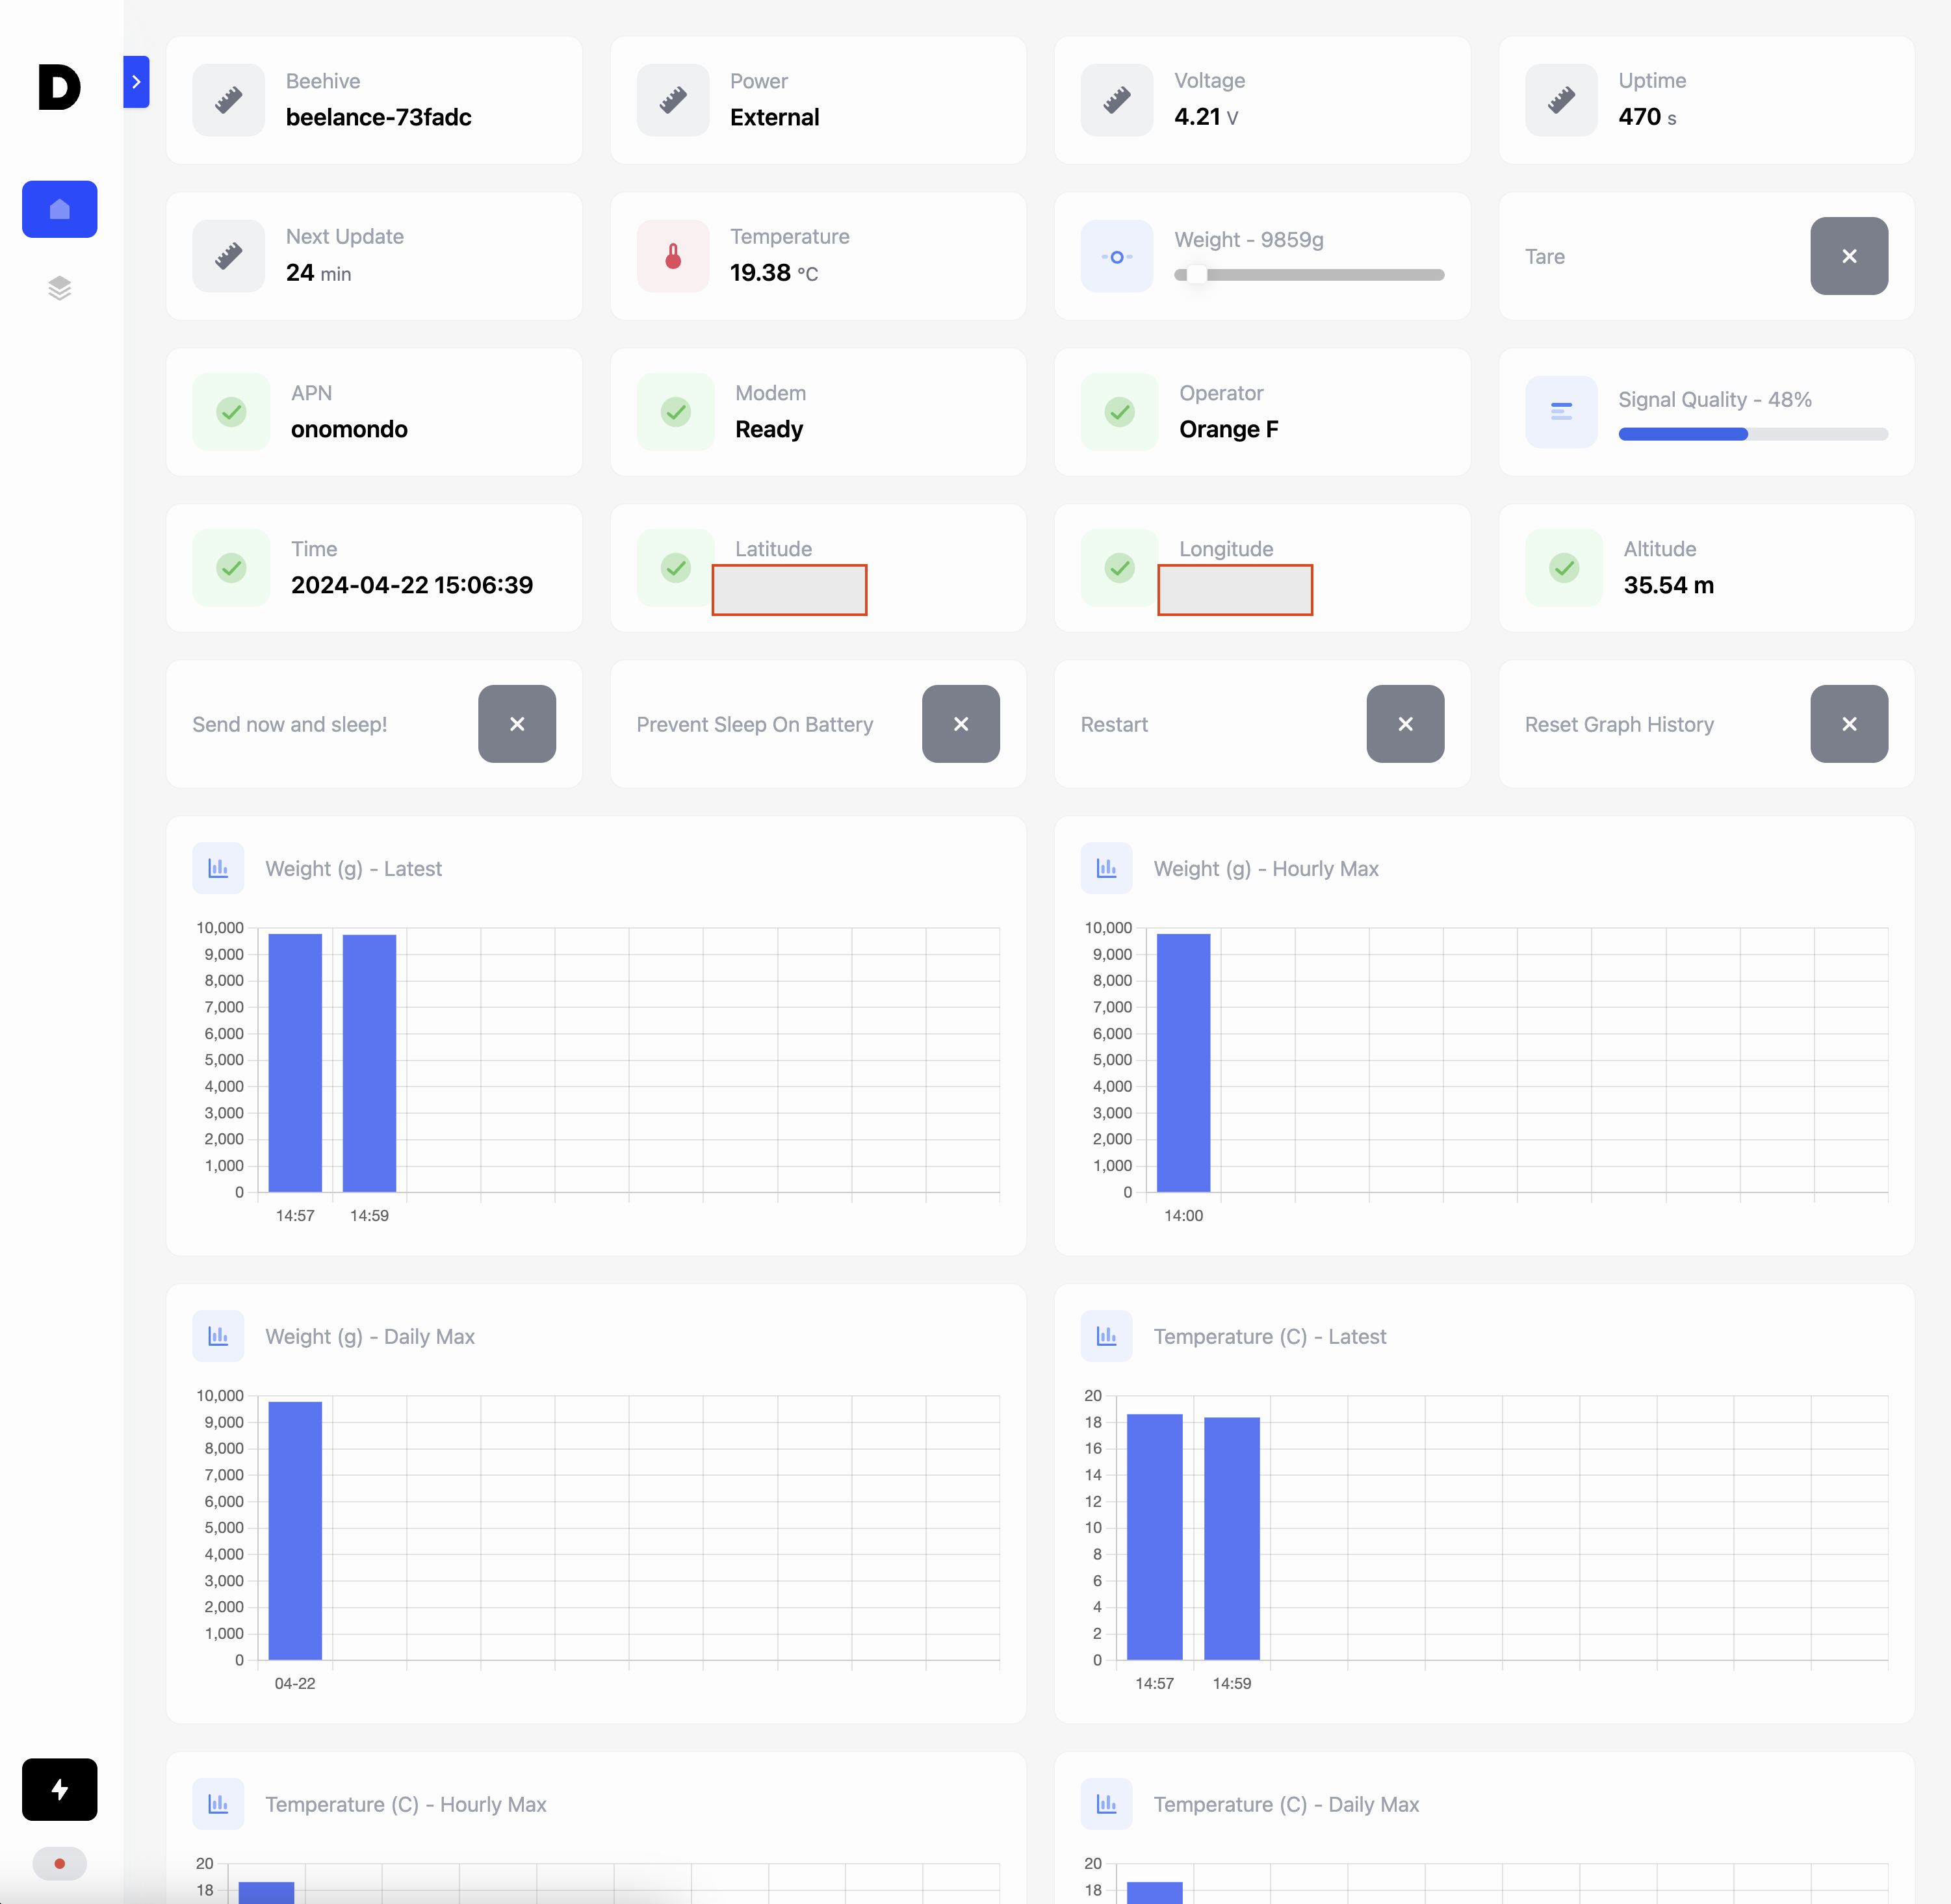
Device interface:
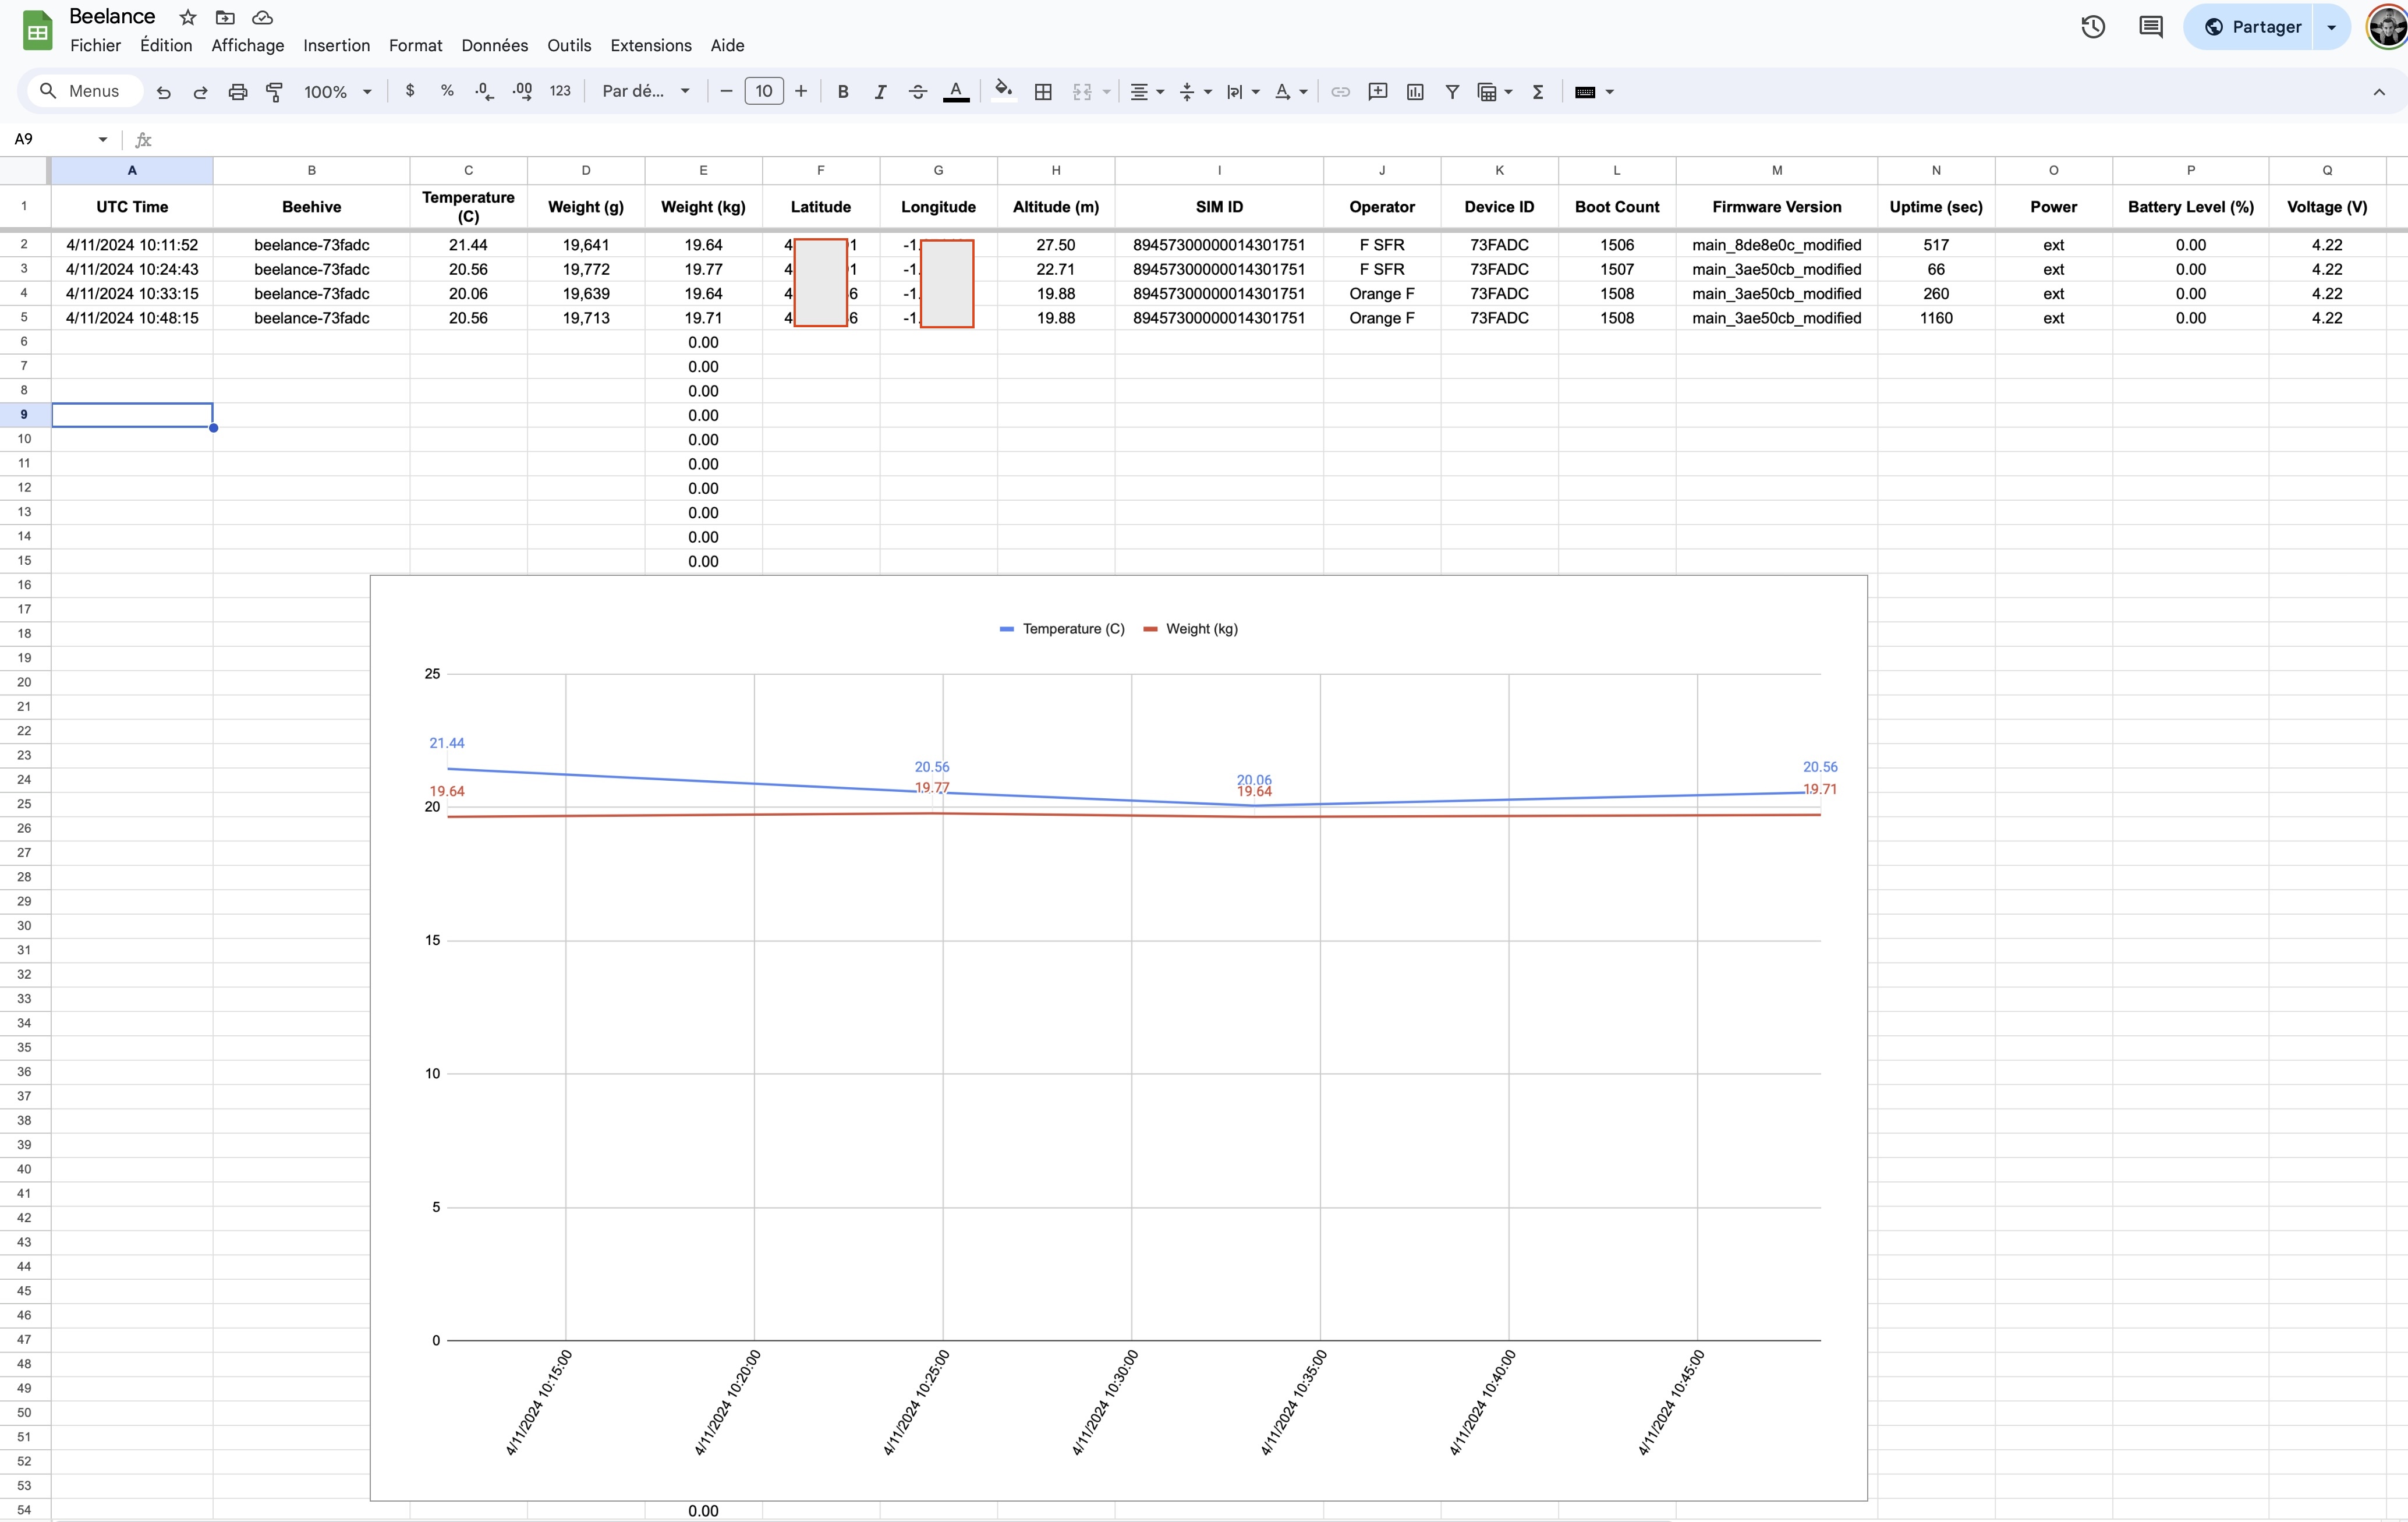
Example of Google Sheet receiving the data:
Features
Powering
Beelance can be powered by USB-C, USB-C Solar Panel or battery. On the field, it is recommended to use a Solar Panel to power the device. If a battery is used, the device will automatically switch to the battery when the solar panel is not providing enough power. Otherwise, the battery will be charged by the solar panel at the same time the solar panel powers the device.
Battery type: 3.7V 18650 LFP or Li-ion
Communication
Supported frequencies: CAT-M (LTE-M), NB-IOT, LTE, 4G
Normal cellular SIM cards or specialized M2M (IoT) SIM cards can be used.
Measurements
The device takes measurements and sends them periodically:
- Temperature (DS18B20 Temperature sensor)
- Weight of the beehive (with 4 load sensors and HX711 amplifier)
- GPS location and altitude
- Time
- Battery level and voltage
- Operator and SIM card information
It will also keep a local history of the 10 last measurements, the maximum values of the last 10 hours and the maximum values of the last 10 days, both for weight and temperature.
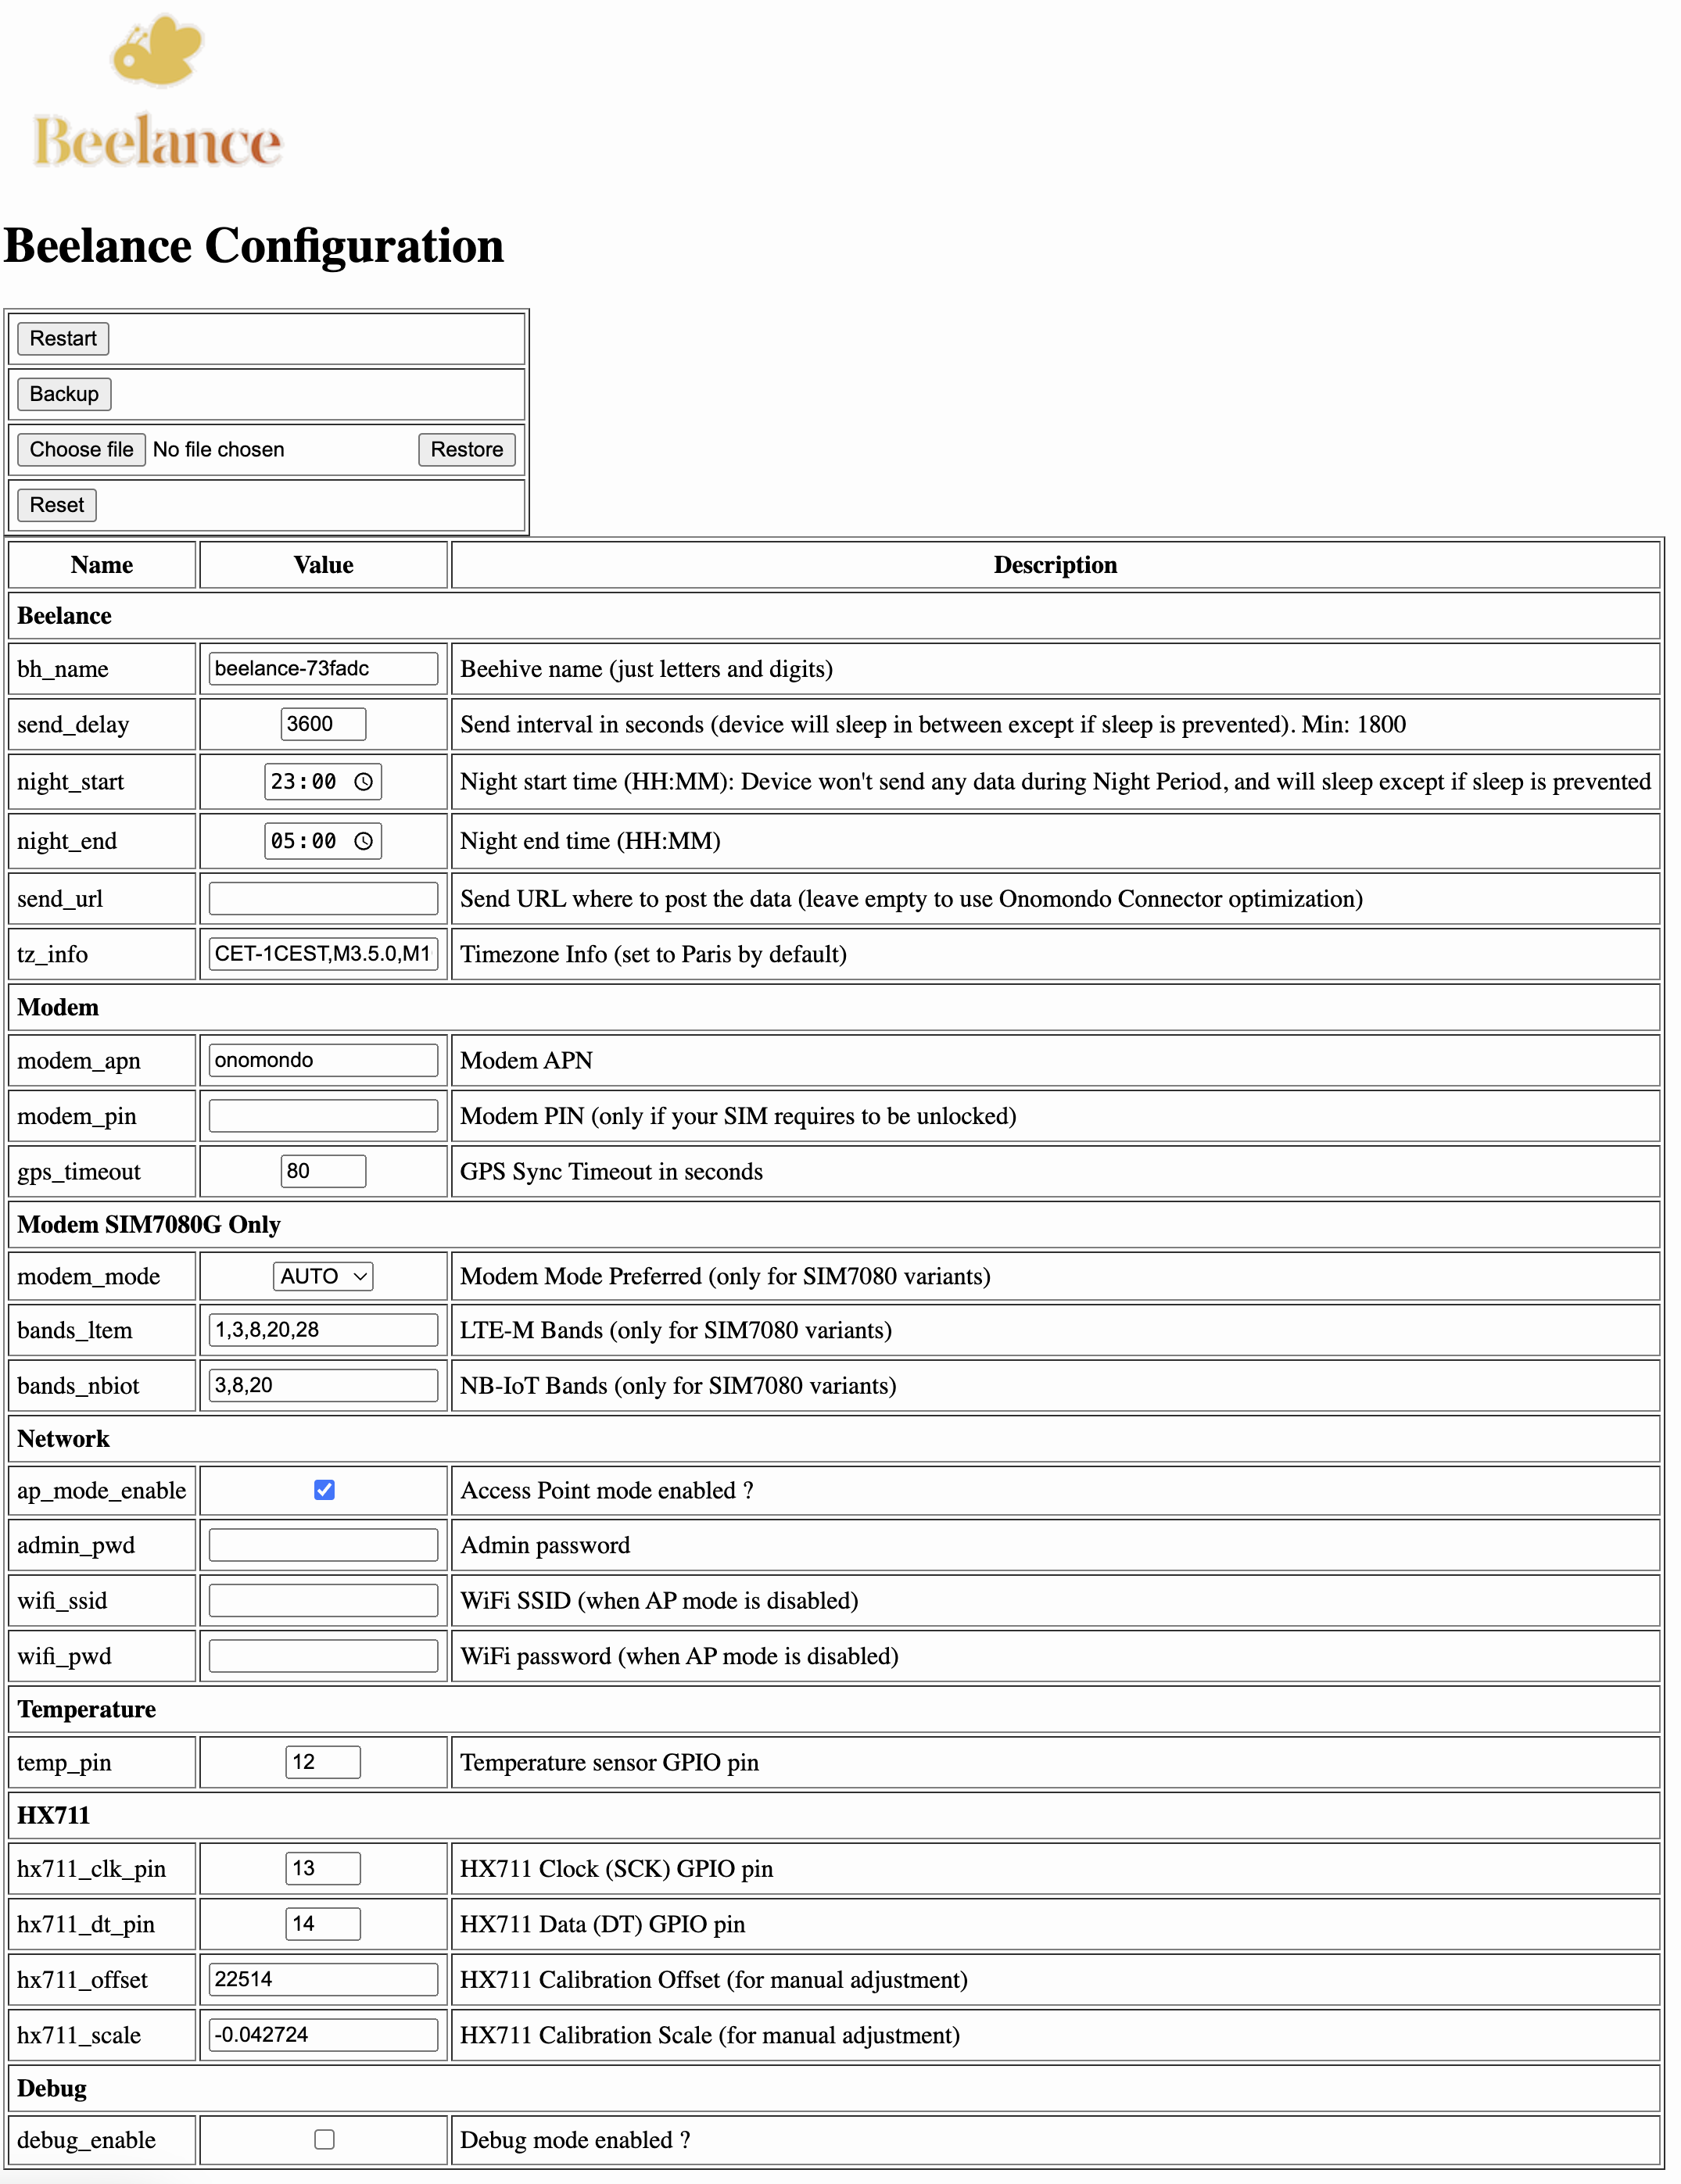
Configuration
The device has an access point, we can connect to it to:
- Access its dashboard to view the metrics and manage the device
- Update the firmware
- Backup and restore its configuration
- Configure the device:
- Beelance (beehive) name
- Time between each measurement push
- The URL to send the data to (optional)
- The APN of the connectivity provider
- The night hours to avoid sending data at night
- Activate Power saving mode (deep sleep between each push)
- etc
Integrations
The device can be configured to send its data to a remove server of your choice. It can also be an IFTTT webhook, which can then insert the data in a Google Sheet.
Downloads
Firmware downloads are available in the Releases page of the project.
Firmware files are named as follow:
Beelance-<VERSION>-<BOARD>.bin: the firmware used to update through web interfaceBeelance-<VERSION>-<BOARD>.factory.bin: the firmware used to flash for the first time
Where:
VERSION: version, ormainfor the latest development buildBOARD: the board name
How to build
Connectivity provider
You need to choose if you go with:
- A IoT / M2M SIM card (with
LILYGO® T-SIM7080G S3 with GPS)- Cheaper if you have several beehives
- Better coverage: LTE-M and NB-IoT are special optimized bandwidth for IoT devices
- Requires to get SIM card from the right IoT / M2M provider
- A normal 4G SIM card from a traditional mobile operator (with
LILYGO® T-A7670G R2 with GPS)- Easier to setup (i.e. in France a cheap Free Mobile SIM card could work)
- Won’t scale with many beehives, and can be more expensive
Here is a matrix of tested LTE-M / NB-IOT provider for France and boards:
| Provider | T-SIM7080G-S3 | T-A7670G R2 |
|---|---|---|
| Things Mobile | ✅ | ✅ |
| Onomondo | ✅ | ✅ |
| Free Mobile | ❌ | Should work |
Onomondo is the recommended communication provider.
It has been tested extensively during development and works very well with the T-SIM7080G S3 board.
Onomondo also has accessible pricing, very good technical support, and provides connectors, a way to optimize the traffic in order to reduce cost even more.
This is the way to go if you have several beehives.
Beelance supports Onomondo connectors, which is a way to considerably reduce costly data traffic and decouple the device from the website collecting the data.
Things Mobile has been tested during development and works well with the T-SIM7080G S3 board.
Things Mobile should should cost around 1-2 euros per month per SIM card (beehive), but the solution is not scalable: it’s not possible to order a batch of SIM cards, and each SIM card costs 5 euros to ship, 1.5 euros to activate, and the minimal balance to add on the platform is 30 euros.
Also, the platform is a mere web interface where we can manage SIM card. There is no connector API like Onomondo, and no details and logs about the connections and traffic.
This solution is good if you have a few connected beehives.
Free Mobile provides cheap SIM cards at 2 euros (or free for people having a Freebox), with 200MB of data per month, which should be enough for a beehive.
Since it works on traditional frequencies (700 MHz band 28), it should work with the T-A7670G R2 board.
Shopping list
Hardware
- Pick one board:
- LTE-M / NB-IOT: LILYGO® T-SIM7080G S3 with GPS (AliExpress) - 42 euros
- LTE / 4G: LILYGO® T-A7670G R2 with GPS (AliExpress) - 47 euros
- Temperature Sensor: DS18B20 Cable + DS18B20 Adapter - 3 euros - SAMIORE Store
- Solar Panels - 33 euros for 2 items
- Weight scale: Set of 4x Load Sensors + HX711 - 6 euros - SAMIORE Store
- Dupont Cable Kit - 4 euros - SAMIORE Store
- One box:
- IP55 Box about 150mm x 100mm x 60mm - 8 euros
- IP67 Box about 200mm x 120mm x 75mm - 11 euros
- If using a battery, take a UL94V-0 box (fire retardant)
- Optional but recommended:
- Water Protection PCB Spray - 30 euros for 400mL
- Battery (18650): Li-ion Battery 18650 3.7V 3200-3600mAh - 15 euros for 2 items
- Charger: Li-ion 18650 battery Charger - 16 euros
- Expandable braided sleeving to protect small wires
- Waterproof connectors - only if you want to go further in the perfection
- 3D printed supports for load sensors, or you can make some in metal or wood yourself
- Waterproof USB-C Sockets - 9 euros for 5 items - Facilitate charging and powering the device without opening the box
WARNINGS:
-
Make sure to verify what you receive. The seller SAMIORE Store is quite reliable: I often buy electronic stuff at this store. I already received broken items or unfinished items from some other sellers.
-
Verify the Solar Panel Voc: it should be within 4.4-6V.
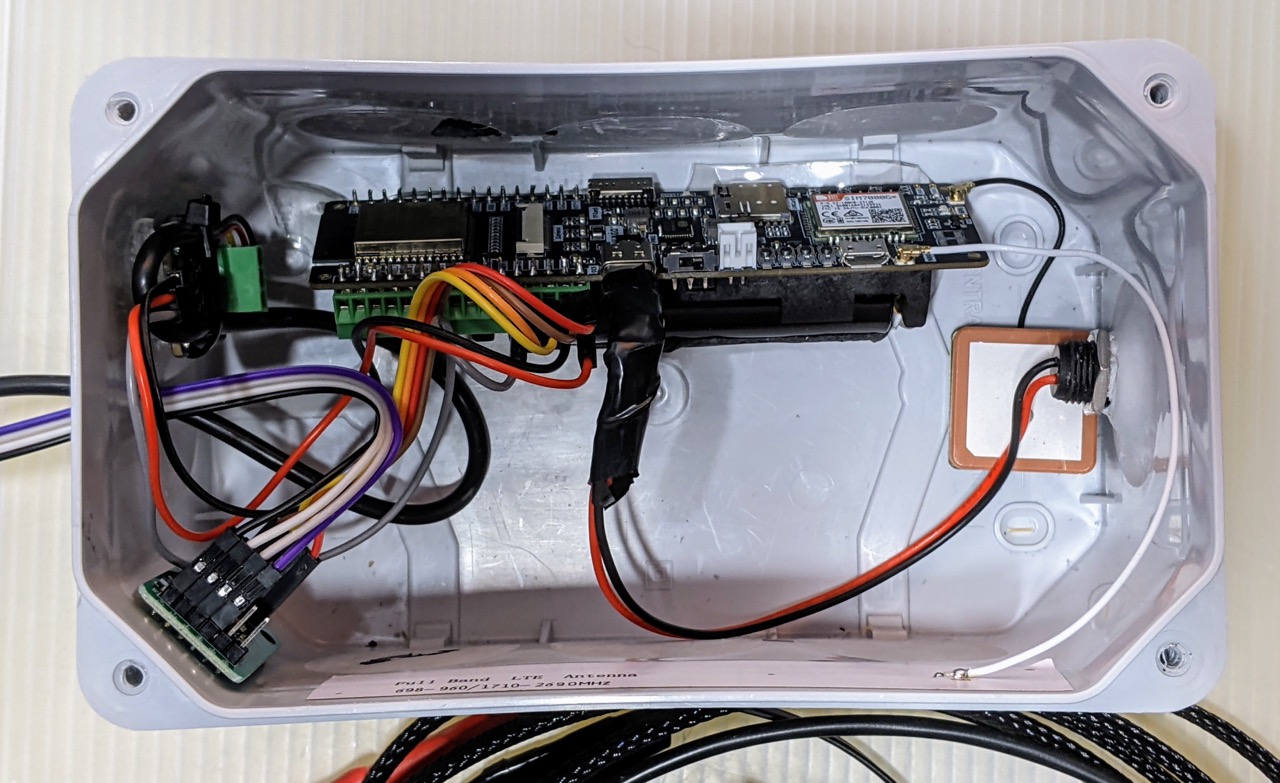
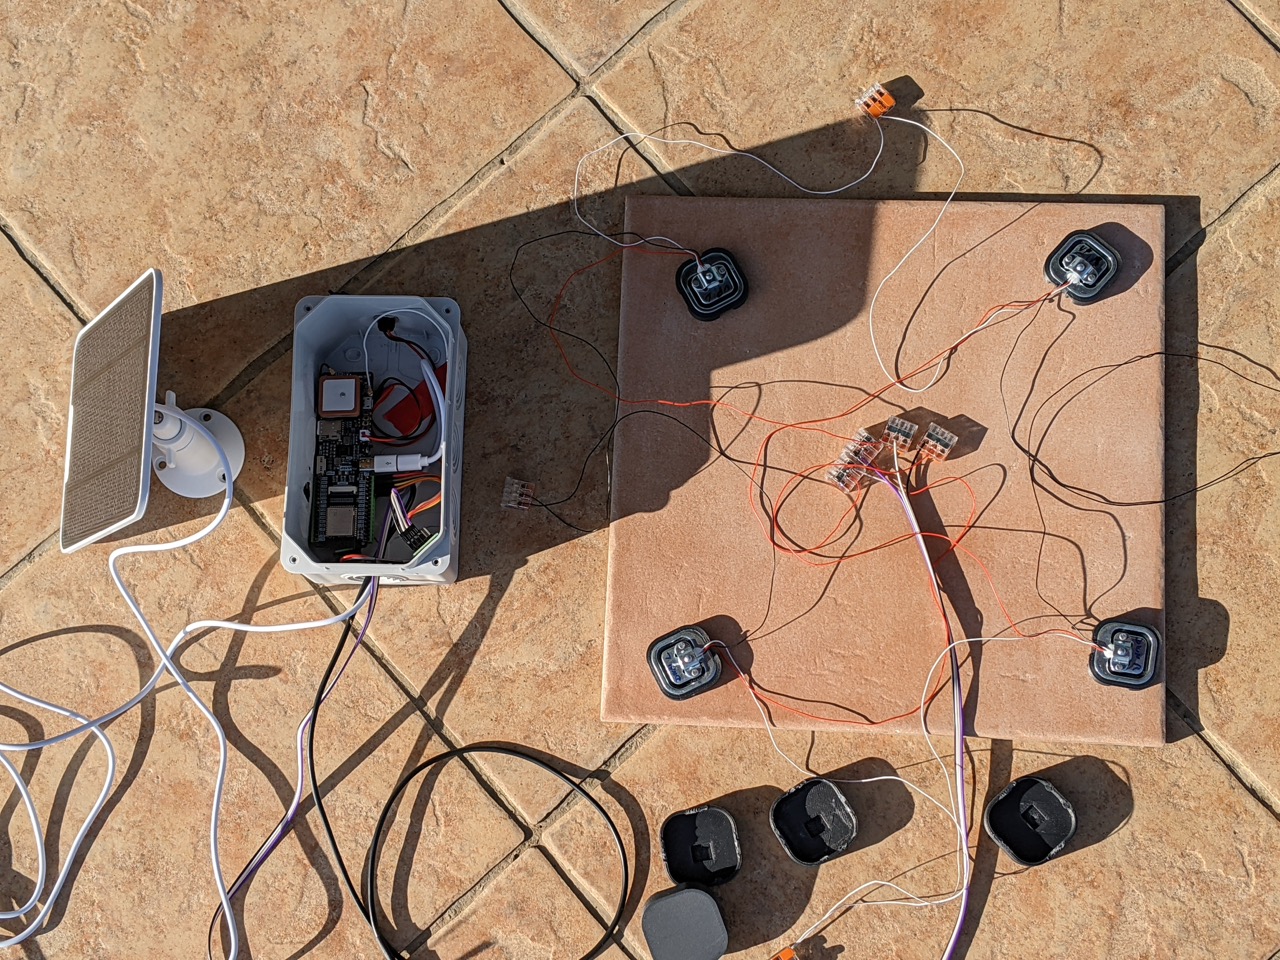
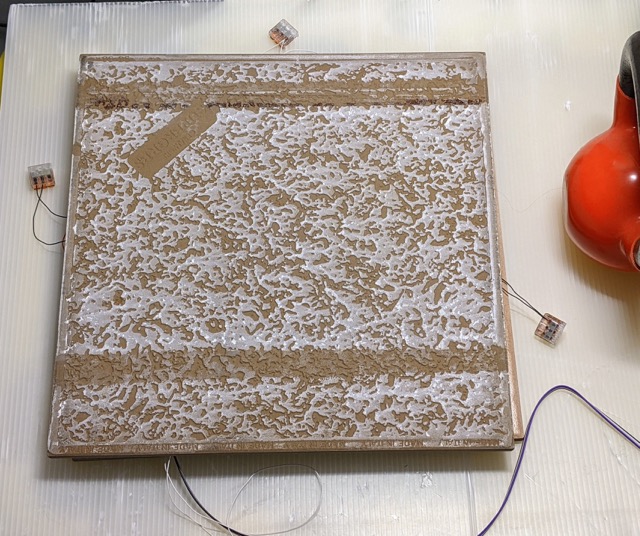
Wiring
- Connect the GPS antenna and LTE antenna to the module
- GPS antenna must be placed on a flat surface, in the same position as in the photo (I decided to put it on the board with a dual face tape)
- Connect de DS18B20 adapter (see GPIO pins table below) and the temperature sensor
- Connect the HX11 adapter (see GPIO pins table below)
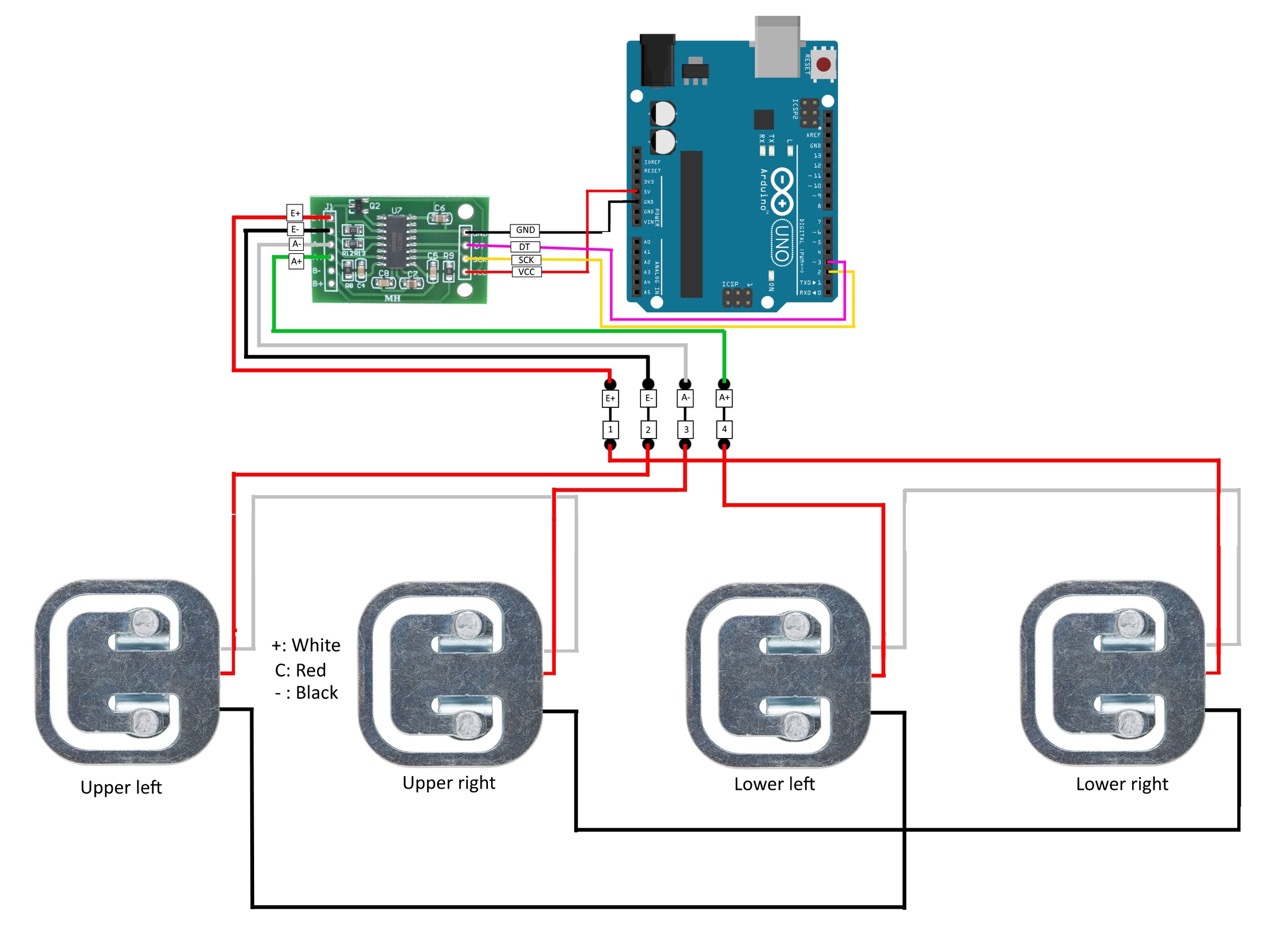
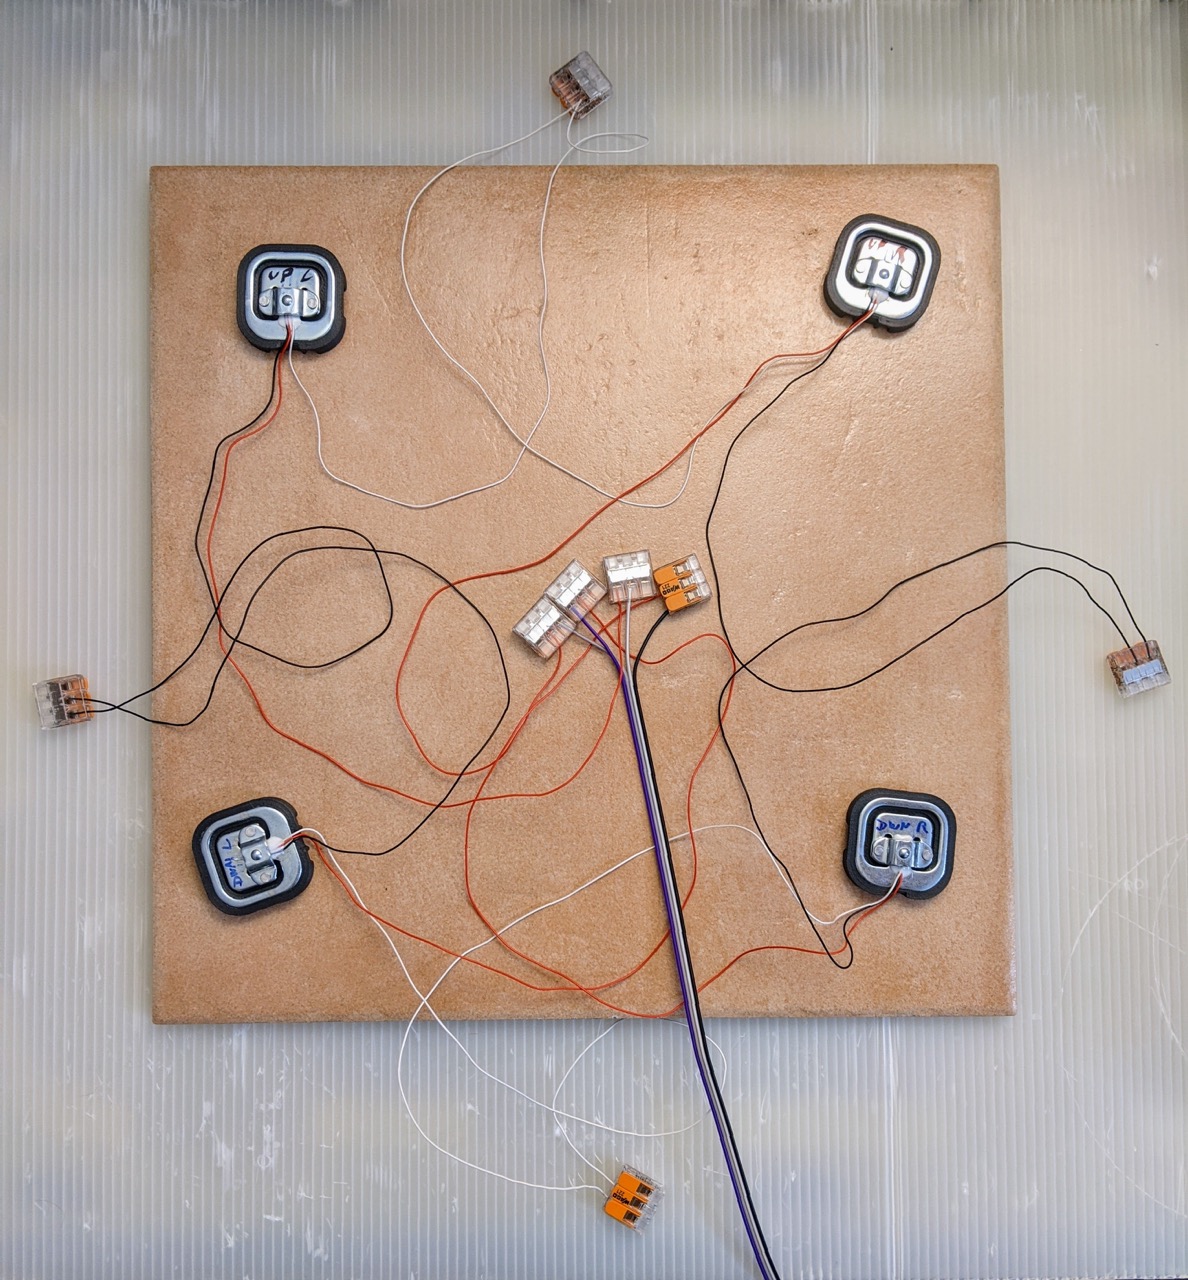
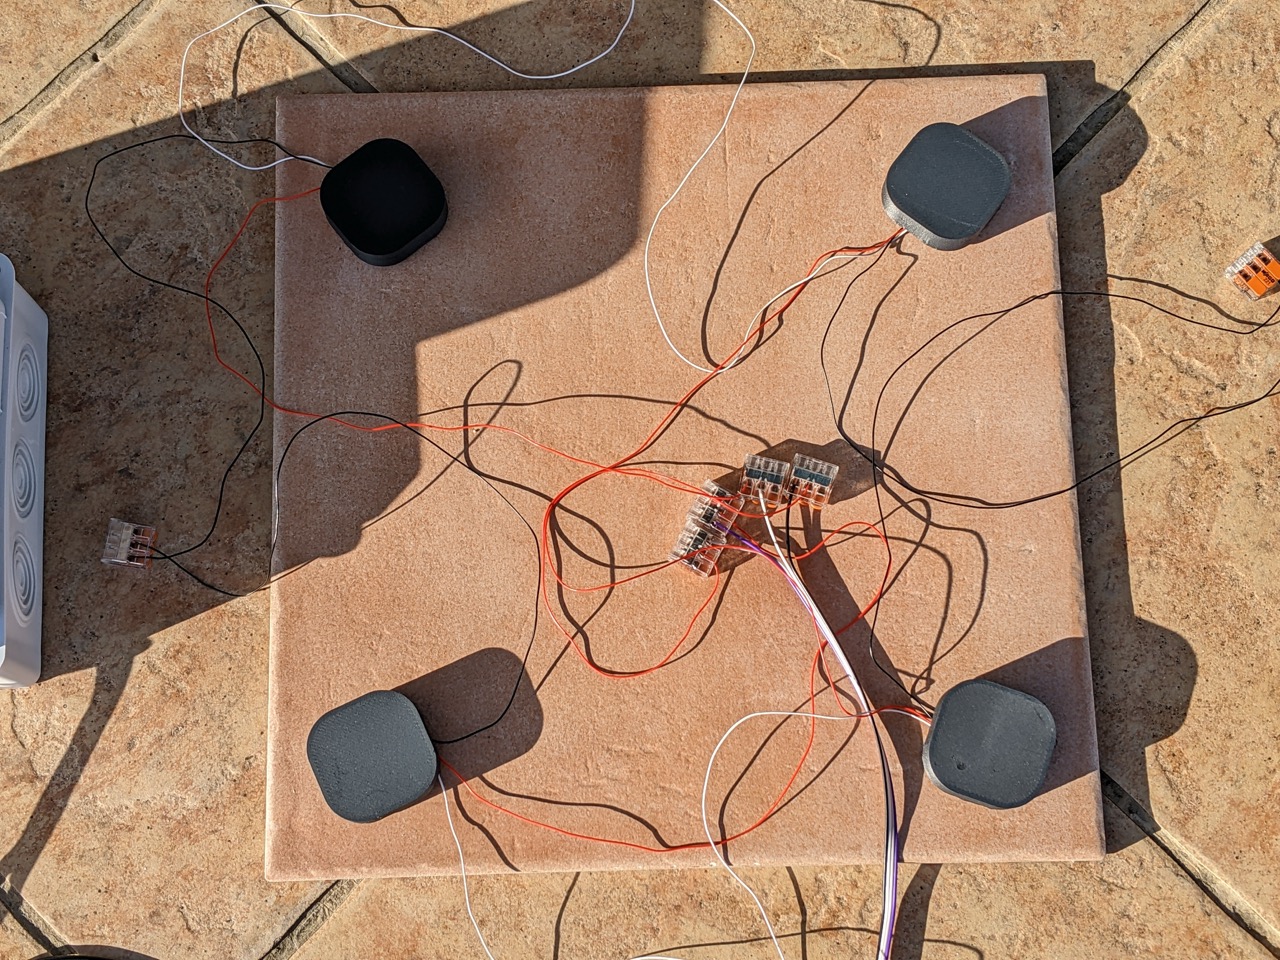
- Wire the weight cells to the adapter according to the schemas and photos below. Please also see this more complete guide also.
- Solar Panel must be connected to USB-C port: this will automatically boot the device when the solar panel are delivering enough power
- Do not forget to apply some protective spray for humidity on the board and components
Default GPIO Pinout
| T-SIM7080G-S3 Pin | T-A7670G R2 Pin | |
|---|---|---|
| Temperature Sensor DATA | 12 | 15 |
| Temperature Sensor VCC | 3.3V | 3.3V |
| Temperature Sensor GND | GND | GND |
| HX711 VCC | 3.3V | 3.3V |
| HX711 SCK (CLOCK) | 13 | 13 |
| HX711 DT (DATA) | 14 | 14 |
| HX711 GND | GND | GND |
How to wire weight cells
 |
 |
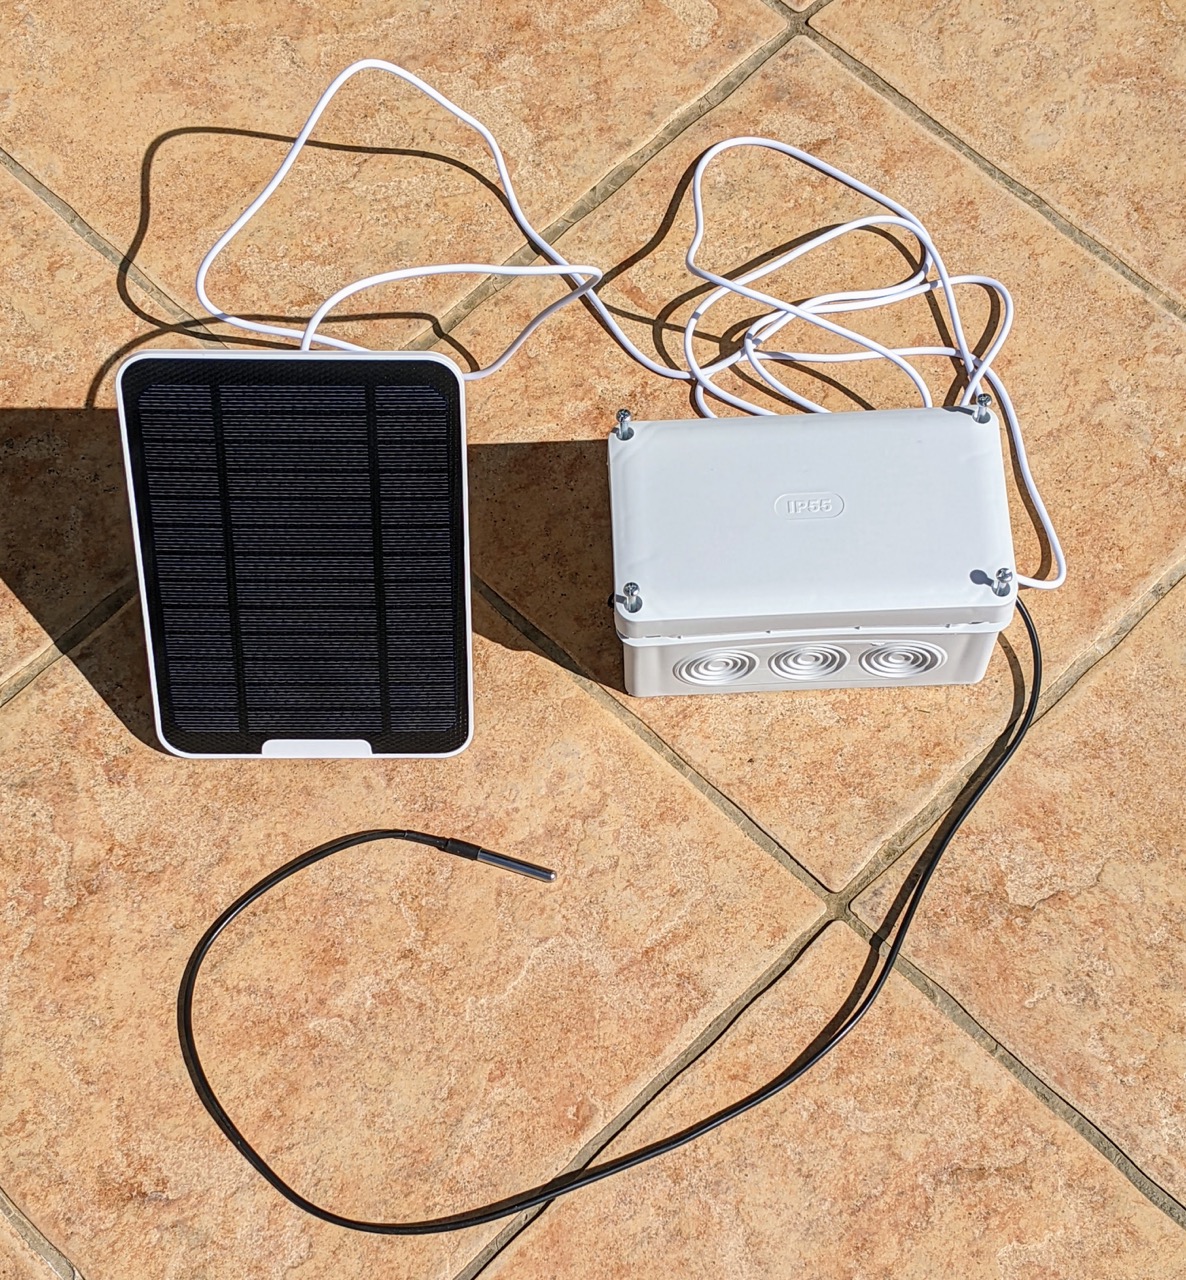
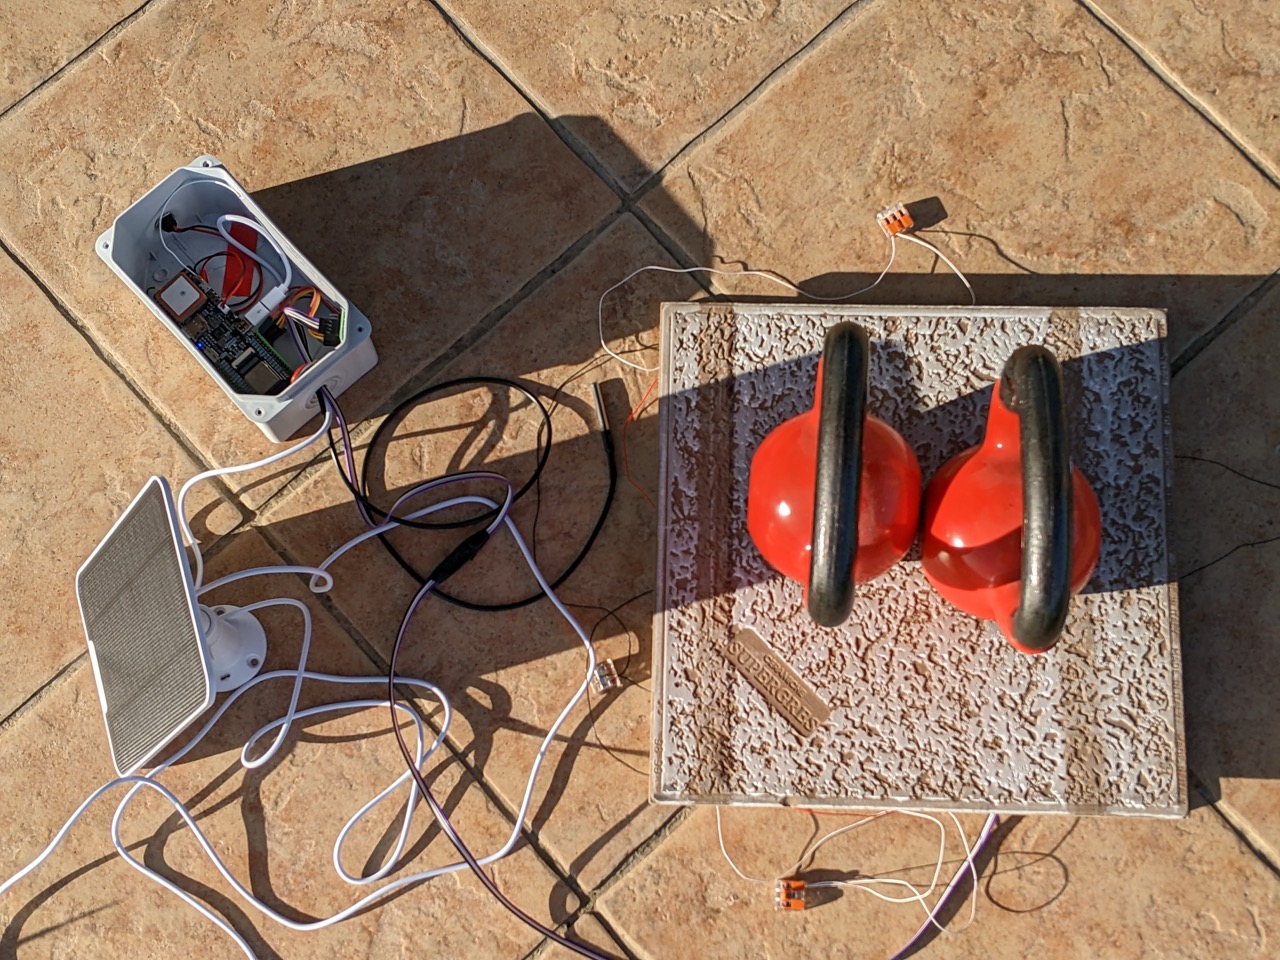
Assembly
The box and solar panel:
 |
 |
The weight sensors with the 3D printed enclosures:
 |
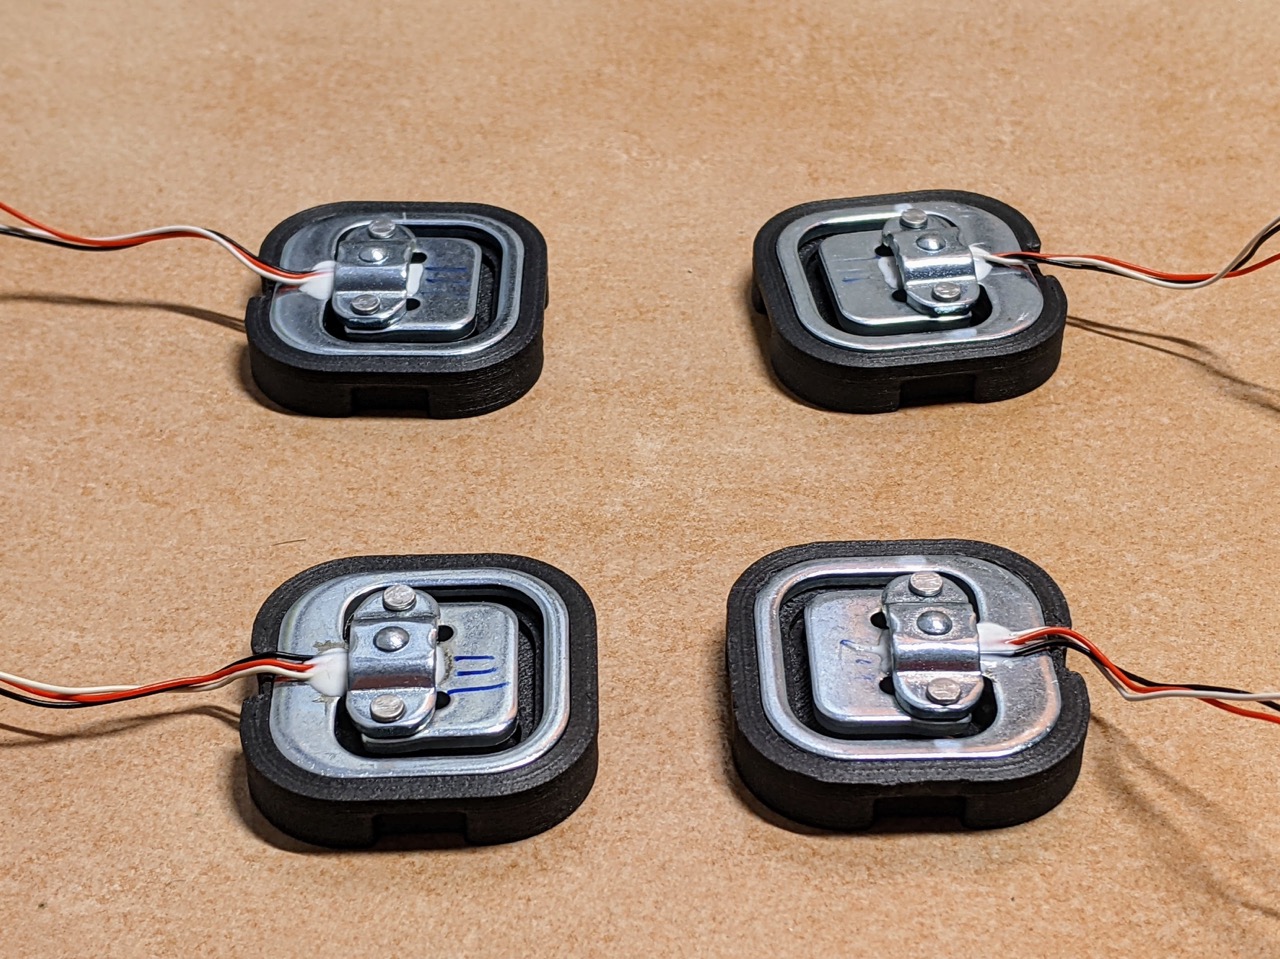 |
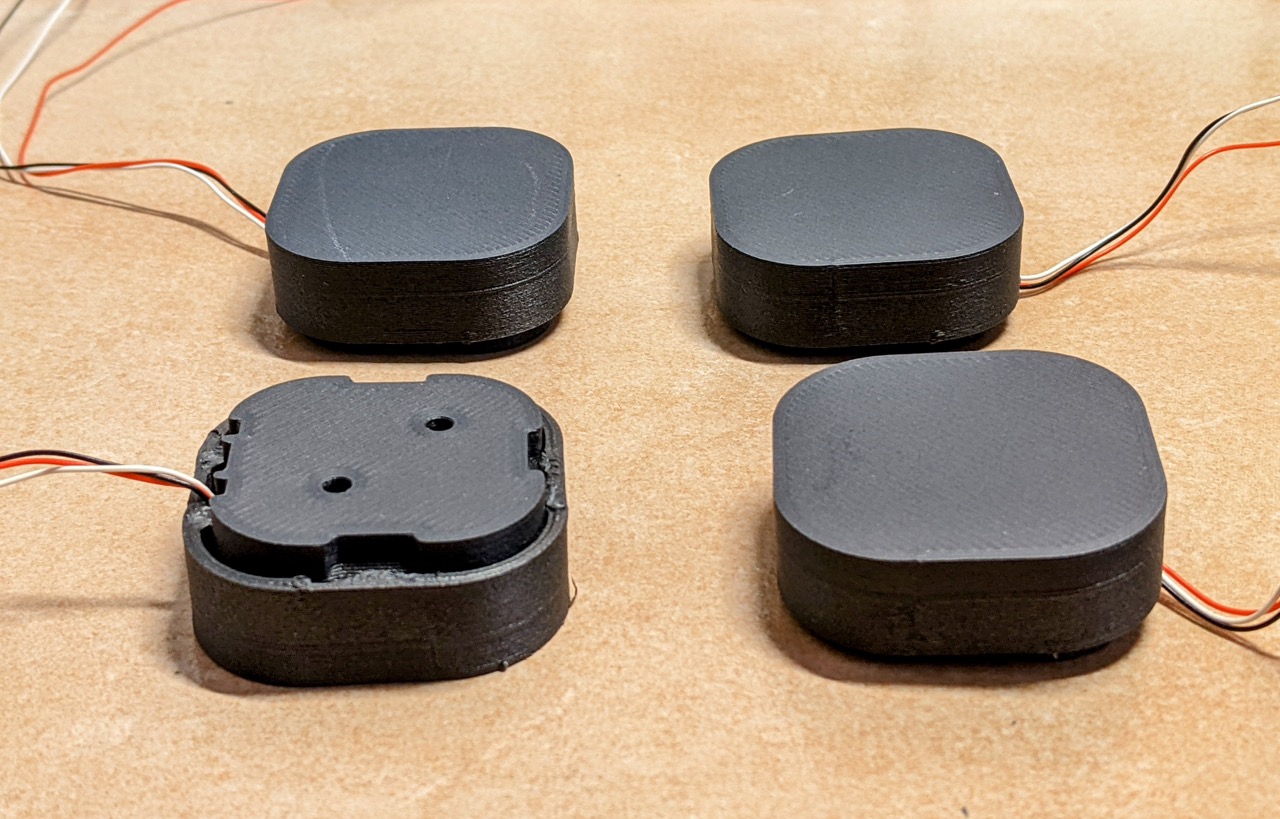 |
Calibration
 |
 |
 |
How to install
SIM card
Do not forget to install the SIM card before powering.
Powering
WARNING / DISCLAIMER:
Leaving a device in nature with a battery is a potential hazard, especially with Li-ion batteries which are not supposed to be used above 60 degrees. Please make sure you are informed with the associated risks with Li-ion or LFP batteries. If you are not sure about the safety of the device, do not leave it unattended or without any monitoring, or do not install any battery. In any case, use an appropriate box which is fire retardant (UL94V-0) and waterproof. The project’s authors decline any responsibility regarding the use and assembly of this project. You are entirely responsible of any loss, damage or injury caused by the use of this project.
Powering with the internal 3.7V battery
This option is compatible with the solar panels.
The board accepts an internal 18650 3.7V battery, but you could pick and Li-ion or LFP battery of 3.7V nominal voltage but with higher capacity. This battery will be recharged when the USB-C will be powered (by solar panel or something else).
it is also possible to use a bigger 3.7 battery and connect the VCC and GND to the internal battery holder.
To start the board from the internal battery:
- Set the board switch to
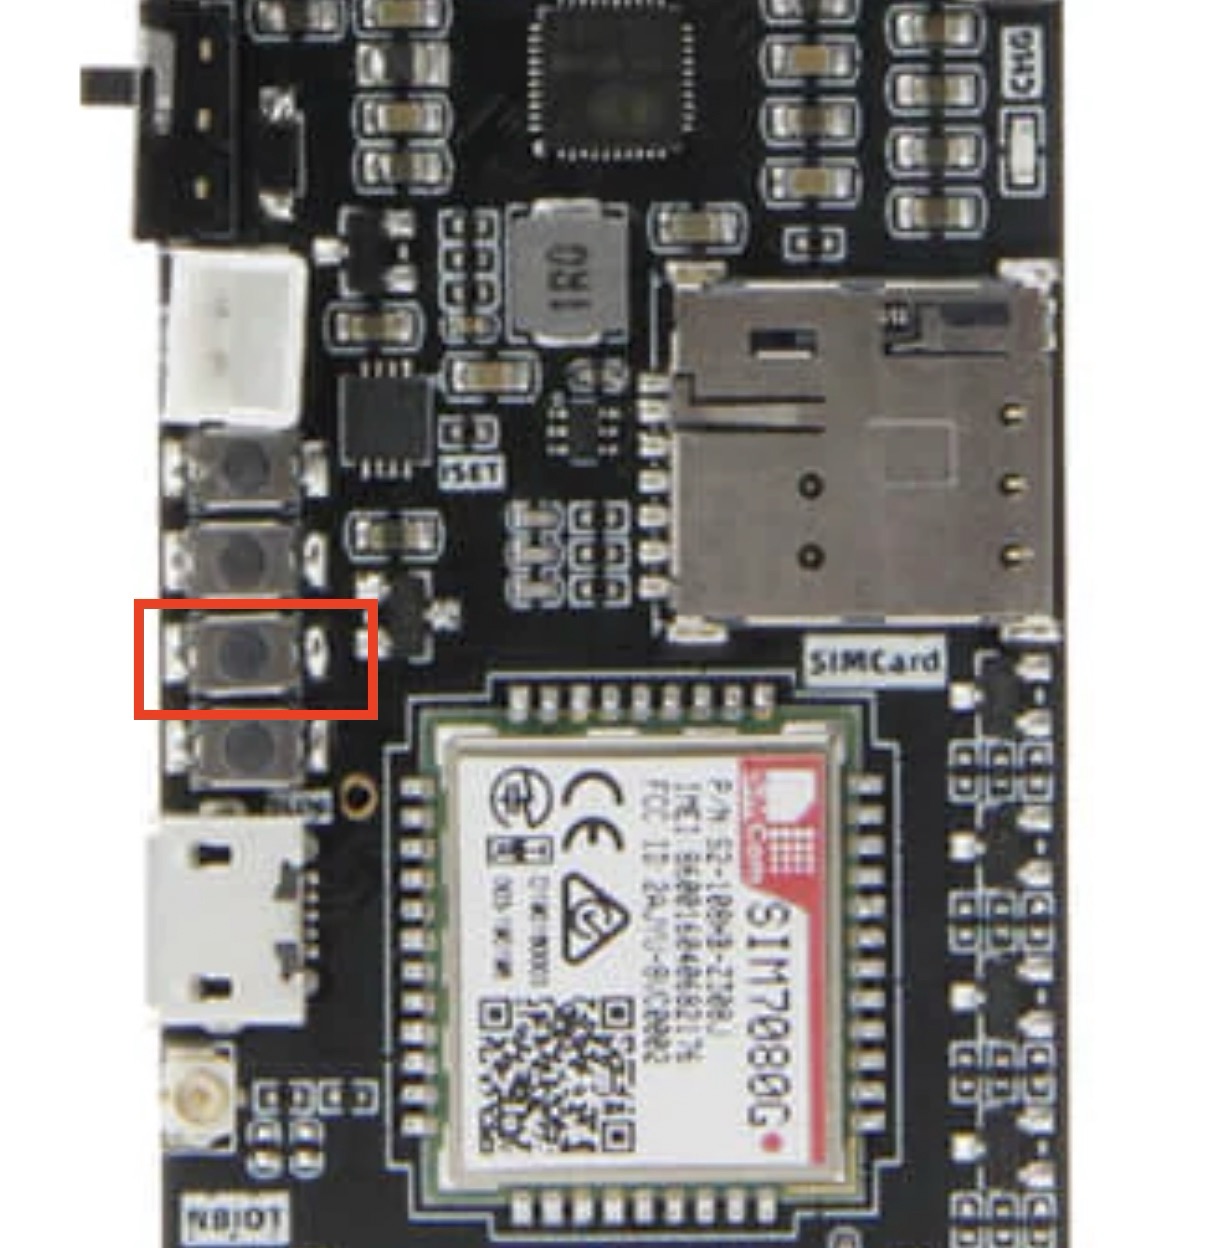
ON - On the
T-SIM7080G-S3, to start from battery, you need to press 3 seconds on the power button
Powering with USB-C power bank
Another option is to use a big power bank of 20000mAh or more and use it to power the device with usb-c. If you are using the sleep option between each push, and send each 2 hours, and use the night mode to sleep the device, a power bank can allow you to last a very long time. The duration depends on the device and push frequency and sleep parameters, but it should last several weeks up to several months.
Powering with USB-C Solar Panel
This option is compatible with the internal 3.7V battery: the solar panel will power the device and charge the battery with the sun and the battery will take over as needed.
DO NOT USE the board internal solar connector. We use instead a USB-C Solar Panel which is capable of automatically power the board in case it shuts down. Never power the device with both the on-board solar connector and a usb-c solar panel.
This option is not working very well with the LILYGO T-A7670G because this board does not have a Power Management Unit (PMU) like the T-SIM7080G-S3.
So when the solar panel is not able to produce enough current, the device will simply not start, until the solar panel voltage becomes 0 and then the device will switch on the battery.
Firmware flash (first time)
First time, flash the entire firmware which includes the partition table and all partitions. Pick the right firmware for the right board.
- Erase the flash
esptool.py --port /dev/ttyUSB0 \
  erase_flash
- Flash the firmware
esptool.py --port /dev/ttyUSB0 \
  --chip esp32 \
  --before default_reset \
  --after hard_reset \
  write_flash \
  --flash_mode dout \
  --flash_freq 40m \
  --flash_size detect \
  0x0 Beelance-VERSION-CHIP.factory.bin
On Windows, you can use the official ESP32 Flash Download Tool. Pay attention to first erase and then flash the entire memory by setting the flash address to 0.
Device Configuration
-
Connect to the WiFi access point
Beelance-XXXXXXand open a web browser tohttp://192.168.4.1. This is the dashboard of the device. -
Go to the configuration page (
http://192.168.4.1/config)
-
Set the following mandatory settings:
modem_apn: The APN of your connectivity provider (TMfor Things Mobile,onomondofor Onomondo)send_url(ONLY IF YOU DO NOT USE an Onomondo Connector): The URL to send the data to. Must be an HTTP endpoint that will receive a Json payload, like an IFTTT webhook. HTTPS sometimes work, but is not recommended because https calls from a little device like that take a lot of memory, CPU, are slower and have a larger payload. So it will cost more money and use more battery power.
-
Optionally change the following settings:
admin_pwd: The password to access the web interface (optional, but recommended)bh_name: A custom name for your beehivesend_delay: The time to pause between each data send (in seconds). Default to 1 hour (3600 seconds) and it is not possible to go below 1800 seconds (30 minutes)night_start: Format:HH:MM. Defines the start of the night, when no data is sentnight_end: Format:HH:MM. Defines the end of the night, when data is sent periodically
In the main dashboard, click to restart the device and wait to makes sure it becomes ready (modem ready, time and GPS fix, etc.).
You can also go to the console at http://192.168.4.1/console to see the logs, and if you really want to see verbose logging, you can activate debug logs in he console.
Once your testing is finished and when installed, you can deactivate the option Prevent Sleep: when disabled, the device will be allowed to go into deep sleep after it has sent the data.
If the device is in deep sleep and you need to access it, just power it and quickly connect and toggle the button to prevent it to go t o sleep again.
Important information about the Modem
Connecting the first time with a new SIM card can take a very long time: first 30 seconds, the app tries to automatically register the SIM with an operator. Cellular communication goes through several steps:
- Modem startup: can take up to 20 seconds
- Network registration: can take up to 30 seconds
- Network search: if step 2 fails can take up to 1 minute
- Try network registration for each search result until one succeeds (can take up to 30 seconds per operator tried)
- GPS search: can take up to 1 minute (timeout can be configured in the configuration page with
gps_timeout)
The device includes a watchdog for all these steps: it will automatically restart if it becomes locked in a state for 5 minutes.
If the device becomes disconnected (loss of Modem IP address), it will try to reconnect automatically.
Weight Scale Calibration
The weight cells are not calibrated by default because each setup is different and will require different calibration values (called offset and scale).
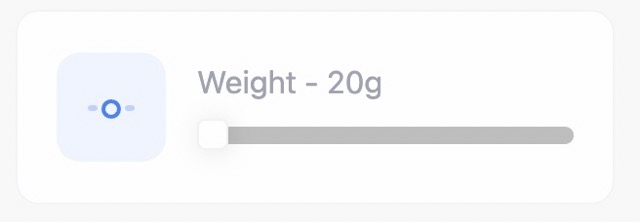
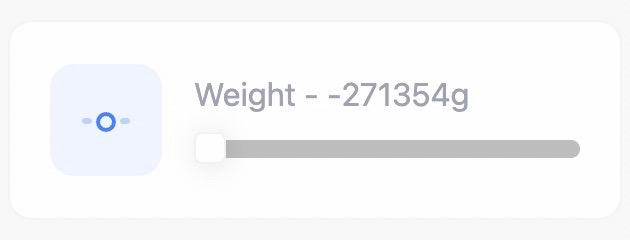
When the device is installed and powered on, you will see some weird values for the weight, which can even be negative:
Follow the steps below to calibrate…
Temperature effect
This is important that you run the calibration at a time of day when you want to see more accurate results.
The temperature has an effect on the load: for example, during the night, the load will be higher because the bees are in the beehive and there is also more humidity in the air and wood. Under a steady bright sun, the temperature is increasing and the load is heating / drying, so the weight will decrease. Here is an example of a 19.8 kg load put on the weight scale for several hours under the sun. You can see that the more the temperature is rising, the more the weight is decreasing. So you need to take this effect in consideration when looking at the statistics. You will still have the same effect whether you include the beehive in your calibration tare or not.
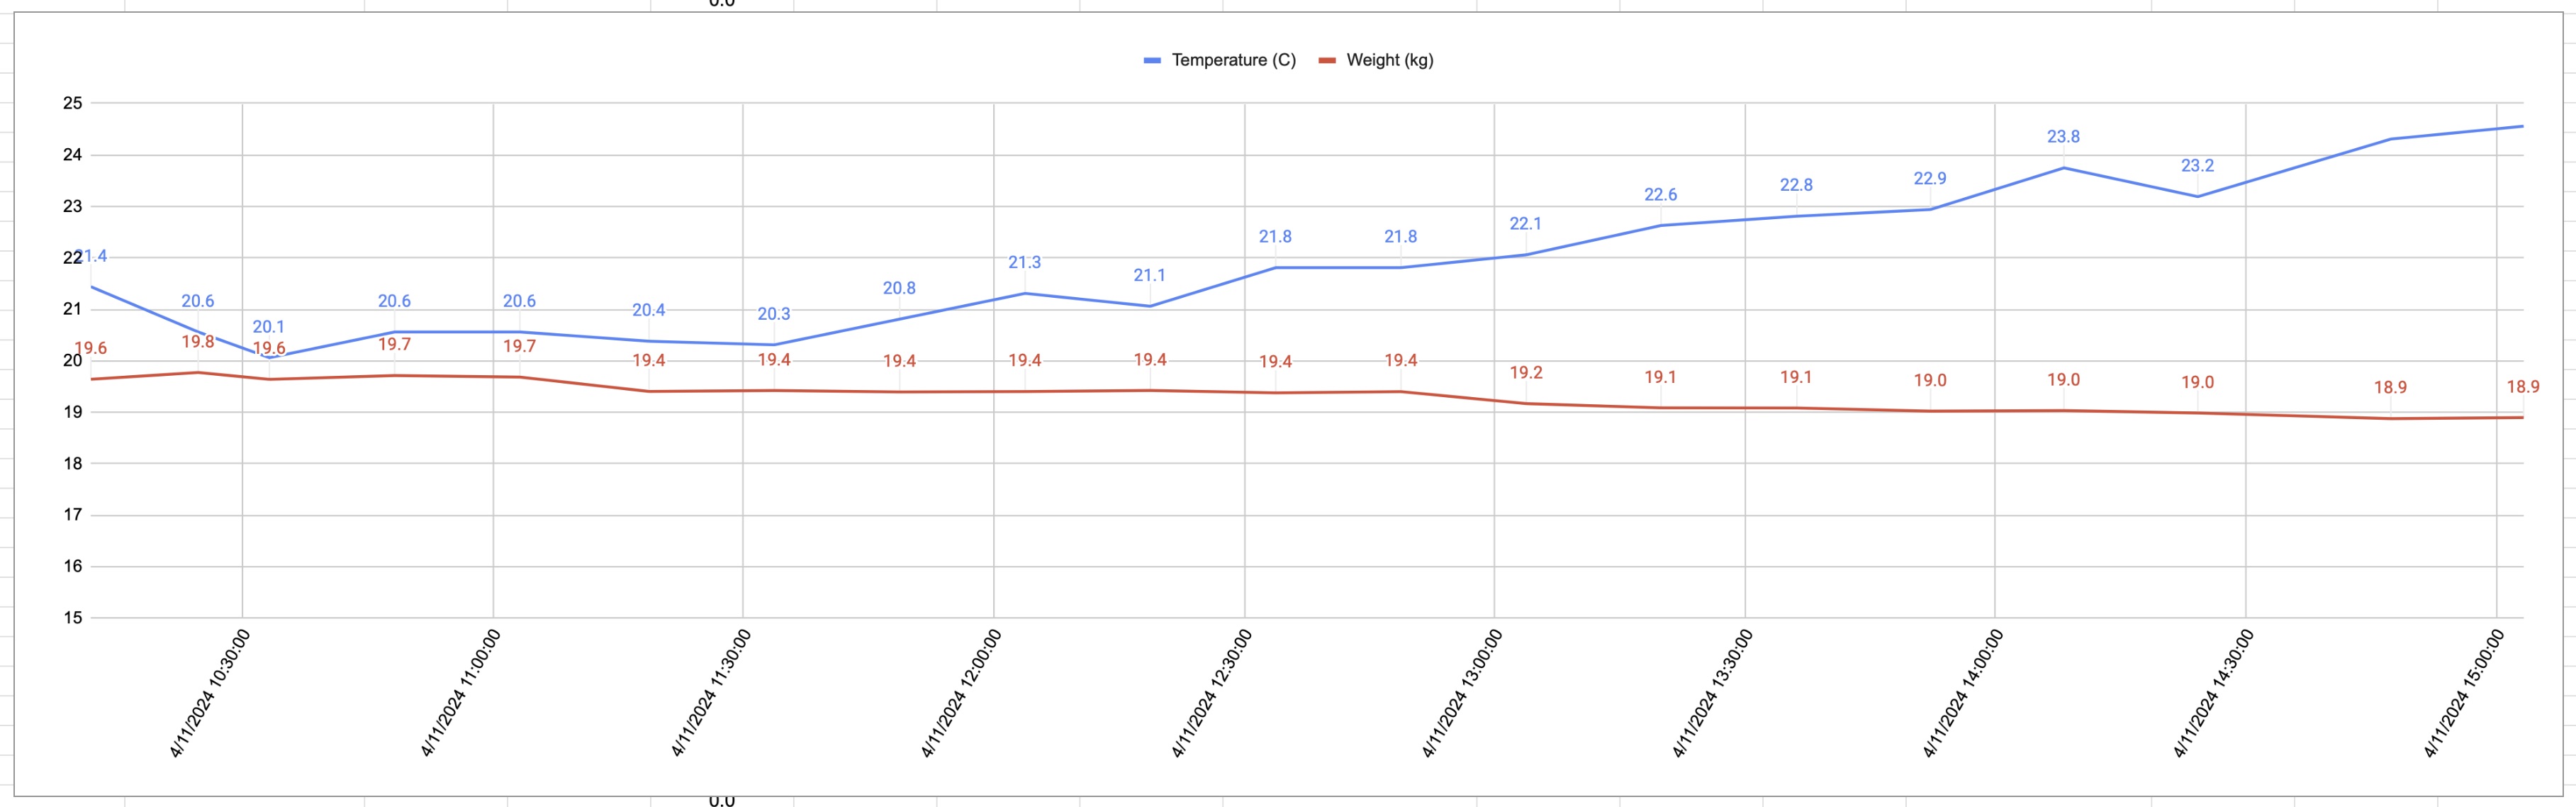
Also, the temperature rising has an opposite effect on the metal of the weight cells themselves: the more the temperature is rising, the more the metal is expanding and the weight is increasing. But this effect is negligible compared to the effect of the bees, honey and humidity.
Offset Calibration
The first step is to calibrate your zero weight (which is called tare).
You can decide to do it with or without the beehive on the scale, depending if you want the reported weight to include the weight of the beehive or not..
Press the Tare button to do so.
 |
 |
 |
Once pressed, the weight should become close to zero.
You can press the Tare button again to find a more accurate zero weight, but note that there will still be some inaccuracy of about 100 grams.
If you end up with a weight which is changing between -50 and 50 grams, this is pretty good.
Scale Calibration
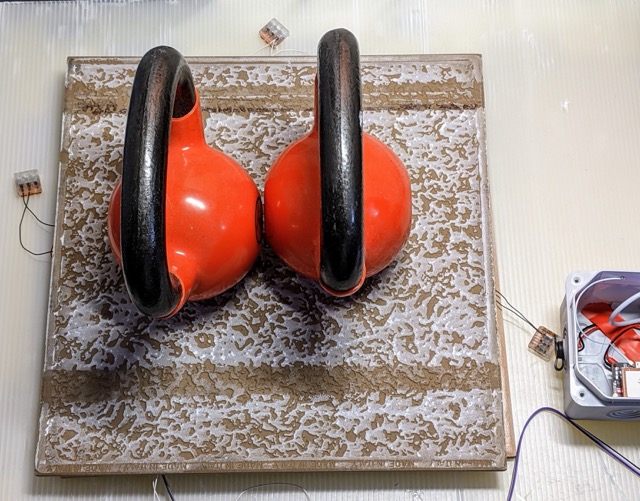
Once the baseline is set, the second step is to calibrate the scale. This ensures to get the right weight in grams when there is a load on the scale. To do that, place on the setup (on the beehive or on the scale) a load of about 15-20 kg, like a big bag of sugar or anything else. YOU MUST KNOW THE EXACT WEIGHT OF THIS LOAD.
This is important that:
- You know the exact weight of the big bag of sugar.
- The load represents the load you will measure. For example, if you have calibrated the baseline with your beehive, you will only measure the bees and honey. So the weight will be lower compared to if you had calibrated the baseline without the beehive, and then put the beehive on the scale later.
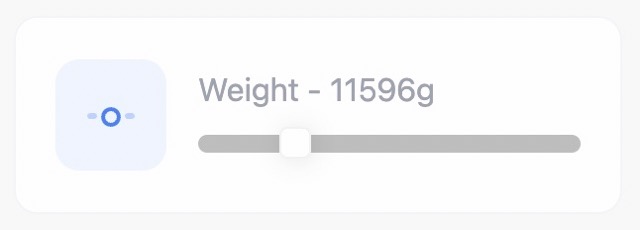
When placing the load on the scale, the numbers will change to something strange and could even be negative. For example, I’ve put a total of 11.6 kg on the scale and here is what I see:
|
 |
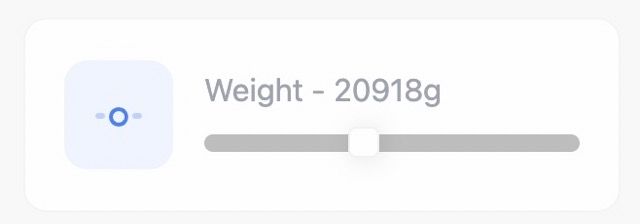
The next step is to move the cursor to place it to the exact value of the load you have put on the scale.
For example in my case I set the cursor to 11600 g.
 |
 |
Once the cursor is set to the right position, after 2 seconds, the device will resume the measurements and you will see the weight changing around the calibrated value. If it becomes too high or too low, move the cursor again to the expected weight value.
Wait for 24 hours. for the meta weight cells to adapt to the load, and check the weight value again. If it has changed too much (by about 1kg for example), just set the slider again to the right value.
Under the hood
The statistics section of the dashboard will show you the calibrated offset and scale values.
The tare value represents the weight that is not accounted for in the weight calculation.
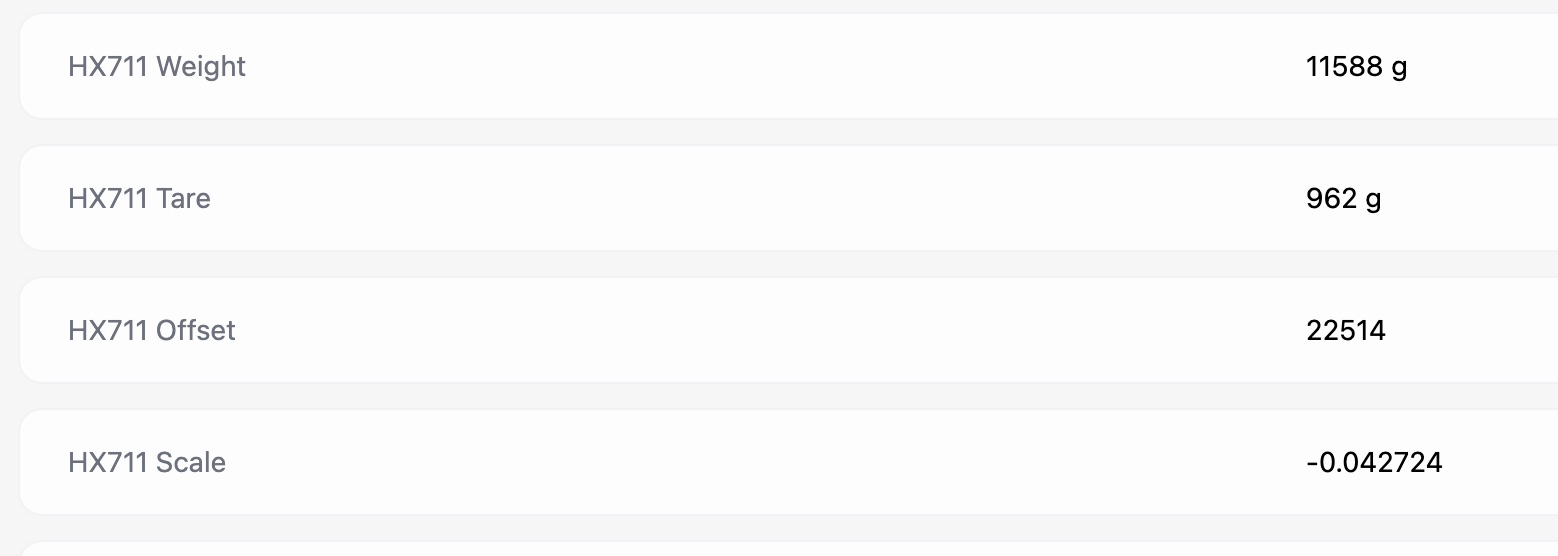
The offset and scale values are saved on the device in the configuration, which can be backed up and restored and accessed in the configuration page at http://192.168.4.1/config.
You can even manually adjust these values.

Receiving the data
JSON Payload
Here is below a sample of the JSON payload that the device will send to the configured URL in a POST request.
{
  "ts": 1712578315,
  "bh": "Ruche-01",
  "temp": 24.25,
  "wt": 15000,
  "lat": 44.1234,
  "long": -2.1234,
  "alt": 7.4,
  "sim": "89457300000014000000",
  "op": "20801",
  "dev": "73FADC",
  "boot": 1358,
  "ver": "v1.2.3",
  "up": 10,
  "pow": "bat",
  "bat": 93,
  "volt": 4.13
}
ts: the UTC timestamp as Unix time in seconds. Most systems support such timestamp. I.e. in Javascript:d=new Date(); d.setTime(ts*1000);bh: the name of the beehivetemp: the temperature in Celsius, 0 if not activatedwt: the weight in grams of the beehive. Note that the weight is not accurate because what is important is to track the evolution over timelat: the latitude, 0 if GPS fix failedlong: the longitude, 0 if GPS fix failedalt: the altitude in meters, 0 if GPS fix failedsim: the SIM ID (ICCID)op: the name or code of the current operatordev: the ESP32 device IDboot: the device boot count, useful to know if the device reboots often because of a bugver: the firmware versionup: the device uptime in seconds, useful to know if the device reboots often because of a bugpow:bat(for battery powered) orext(when powered by USB-C / Solar Panel)bat: the battery level in percentage. If not running on battery, depending on the board this value will either be 0 (we cannot determine the battery %, or a % if the battery voltage is accurate)volt: the battery voltage, or the external supplied voltage
IFTTT Integration
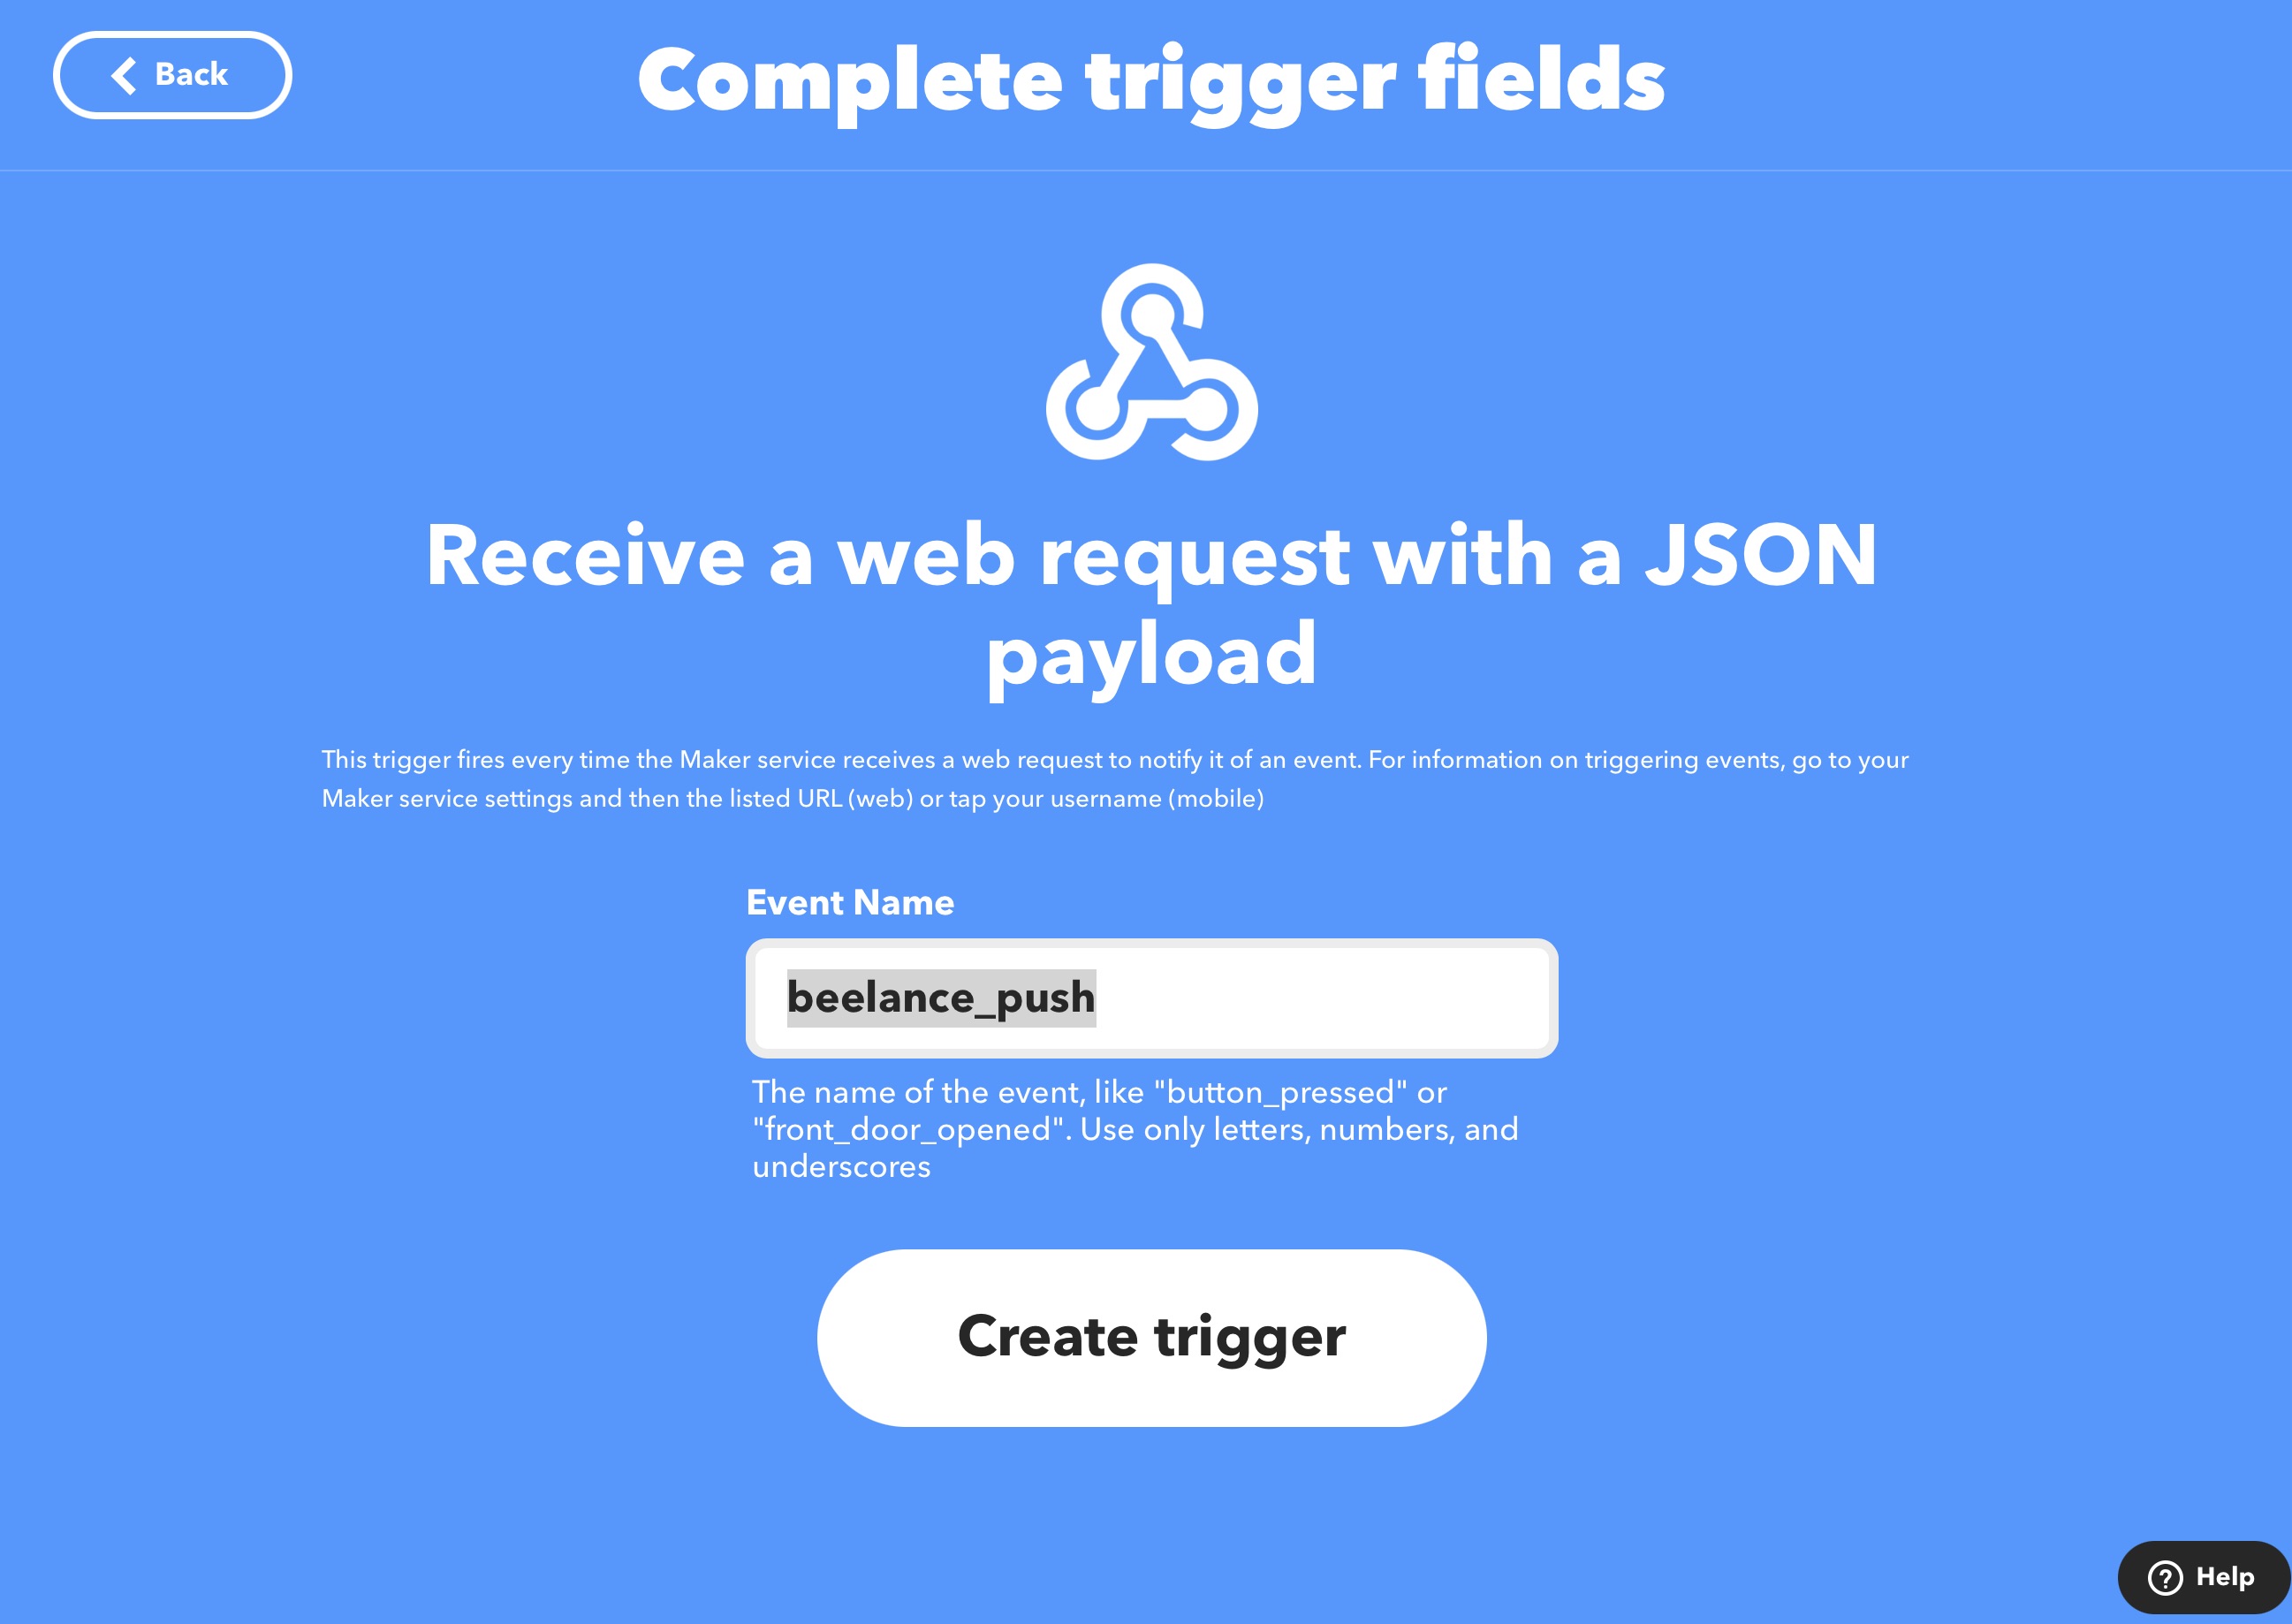
If you have an IFTTT account, you can create an IFTTT applet to receive the JSON payload and insert it in a a new row in a Google Sheet spreadsheet.
To do that, create a new applet with a webhook. The URL of the webhook has to be configured in the device configuration page in the send_url parameter (try use http instead of https).
If you use an Onomondo Connector, the webhook URL has to be configured in your Onomondo connector page.
Here is the filter code you can use to transform the JSON data into cell values. This is optional: you can also receive the JSON in Google Sheet and process it in Google Sheet.
var payload = JSON.parse(MakerWebhooks.jsonEvent.JsonPayload);
payload = payload.payload || payload; // this line is to unwrap the payload from the Onomondo JSON envelope
var formattedRow = "";
for (var k in payload) formattedRow += `|||${payload[k]}`;
GoogleSheets.appendToGoogleSpreadsheet.setFormattedRow(
  formattedRow.substring(3)
);
 |
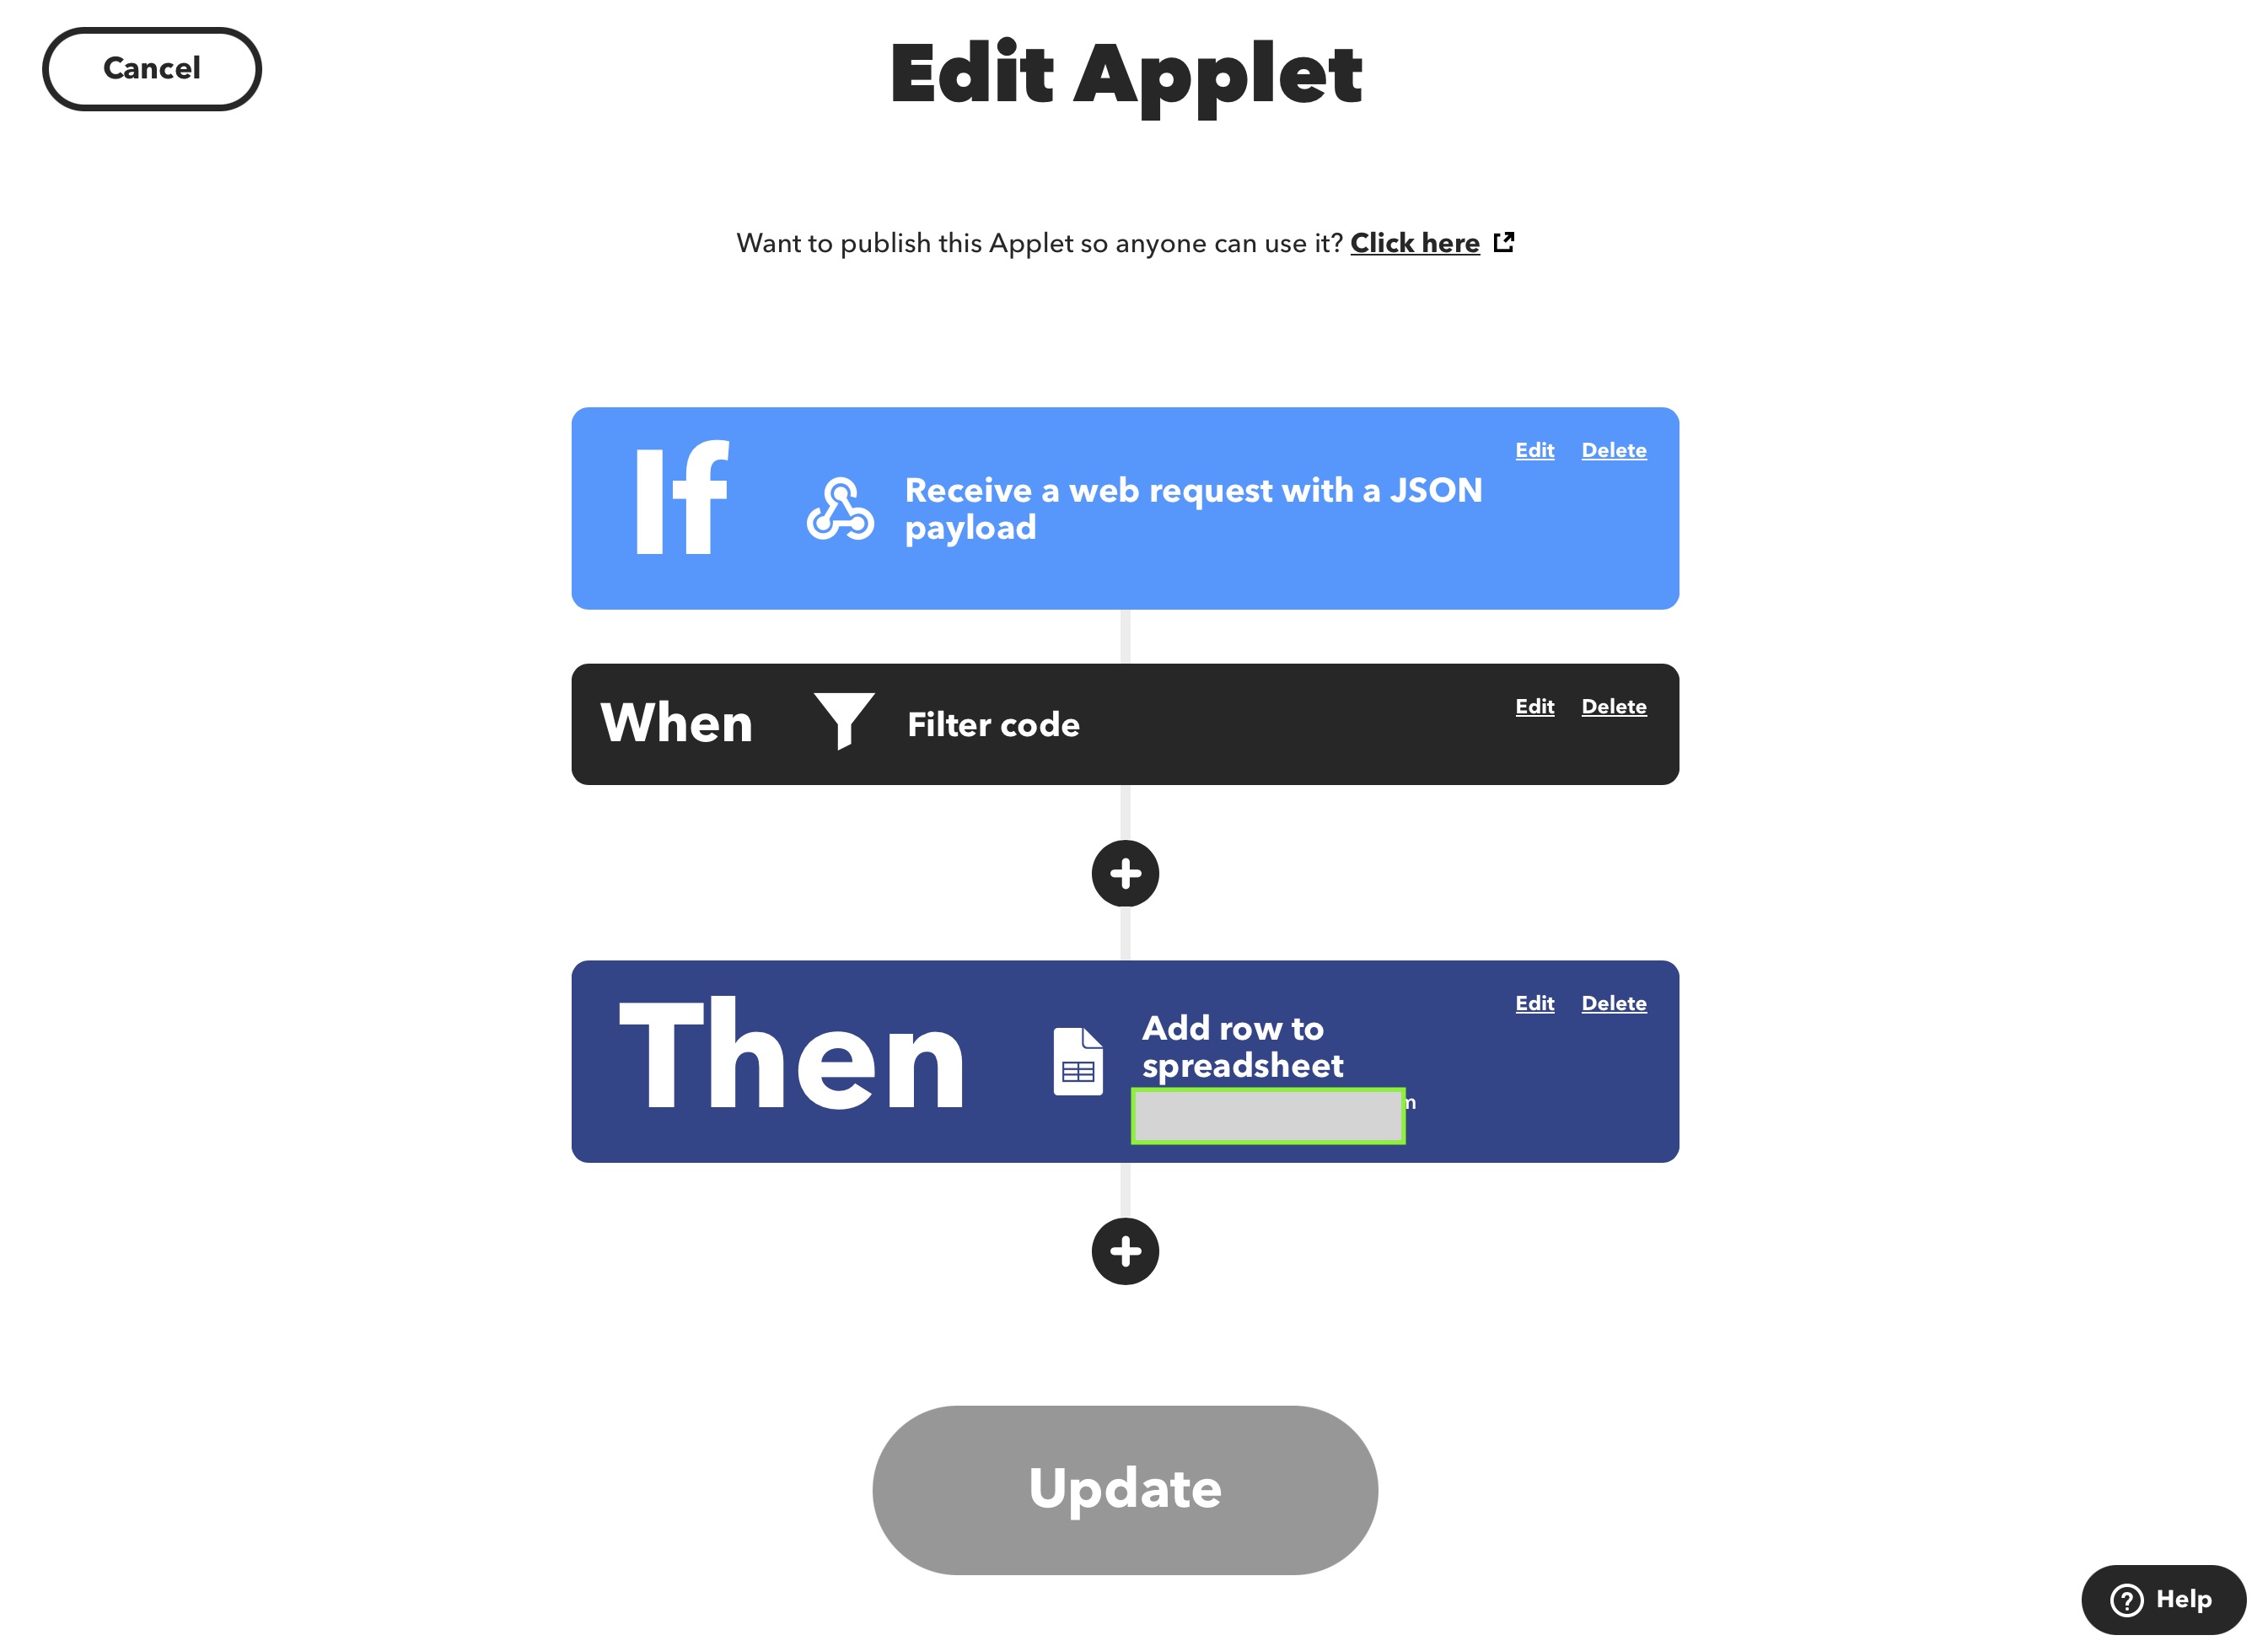 |
Once the applet is in place, every push from the device will reach IFTTT which will feed the Google Sheet. From there, you can create graphs and process the data as you wish.
How to use
Dashboard
The Dashboard is located at http://192.168.4.1/.
For there you can see the device status and access some basic buttons.
Send now and sleep!: will send the data now and go to sleep for the configured amount of time (send_delay) if sleep is not preventedScan Operators: Trigger a new operator scan and new GPS searchPrevent Sleep: Keeps the device active and prevents it from going to sleep after a pushRestart: Restart the device
The statistics menu shows some metrics regarding the device itself.
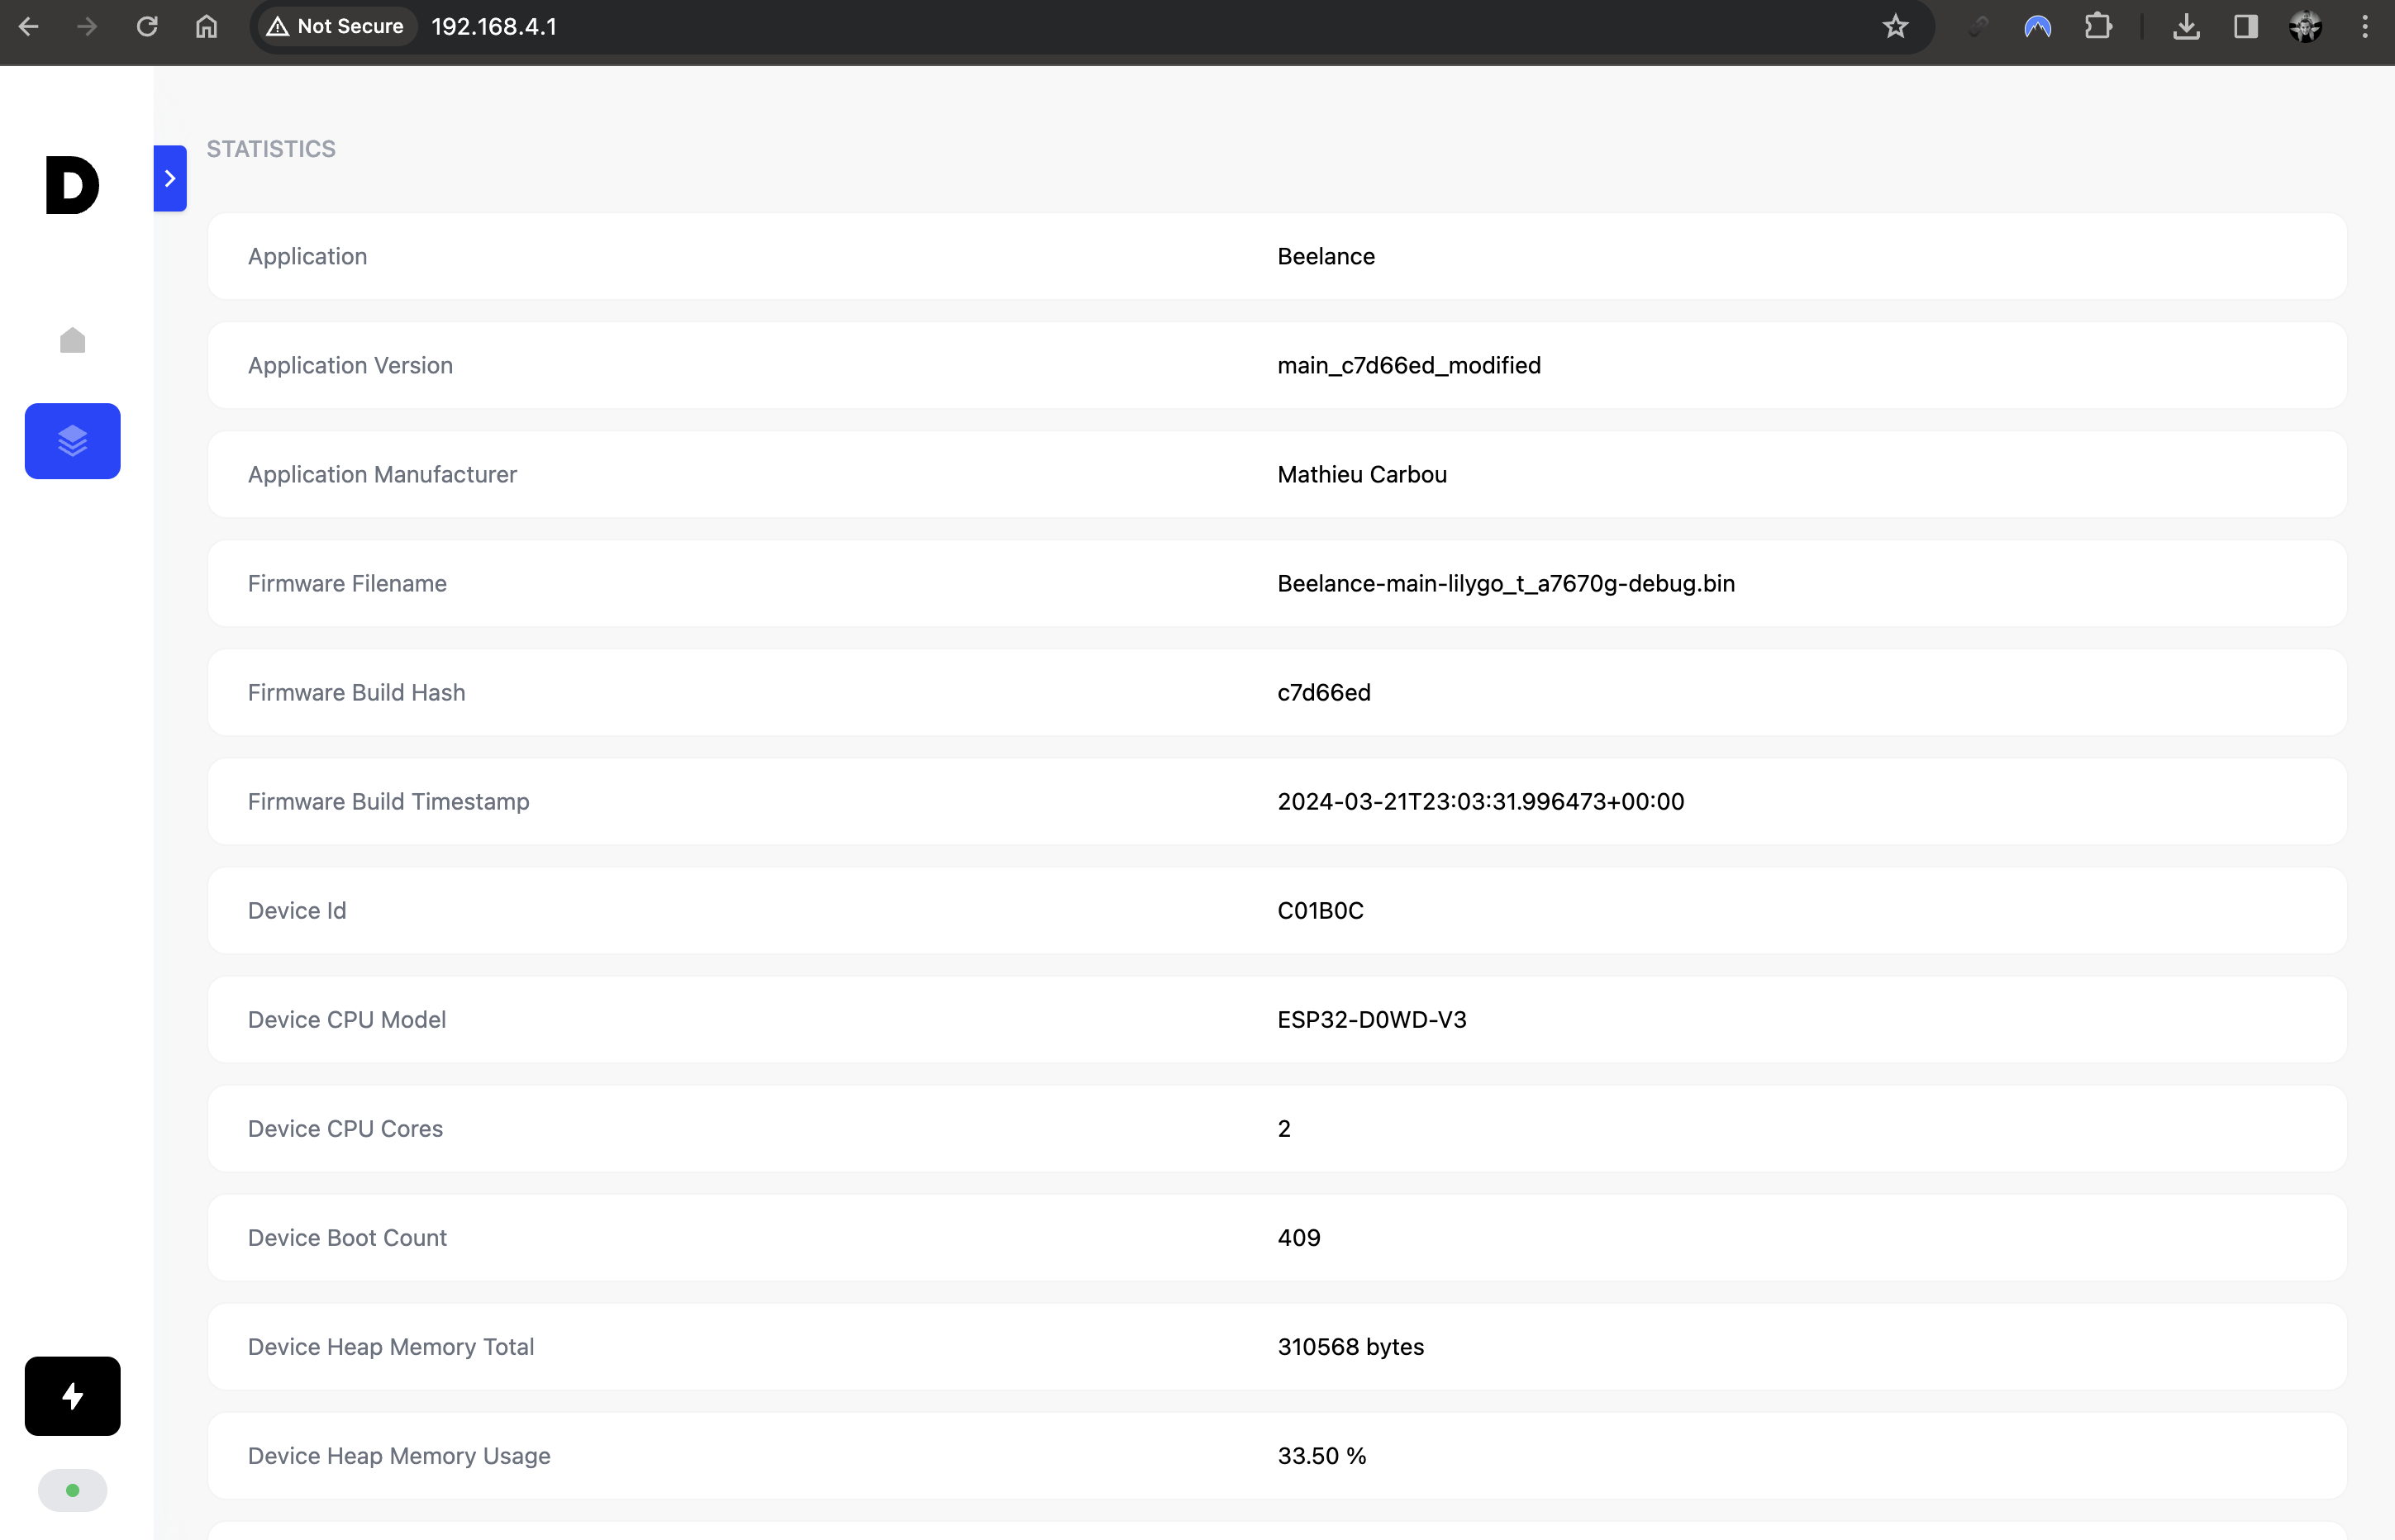
Other pages are available:
http://192.168.4.1/update: OTA Web Update pagehttp://192.168.4.1/config: Configuration page (with backup and restore)http://192.168.4.1/console: Web Console to see logshttp://192.168.4.1/api/: API endpoints with more technical information about system, sensors and connectivityhttp://192.168.4.1/api/apphttp://192.168.4.1/api/beelancehttp://192.168.4.1/api/confighttp://192.168.4.1/api/networkhttp://192.168.4.1/api/system
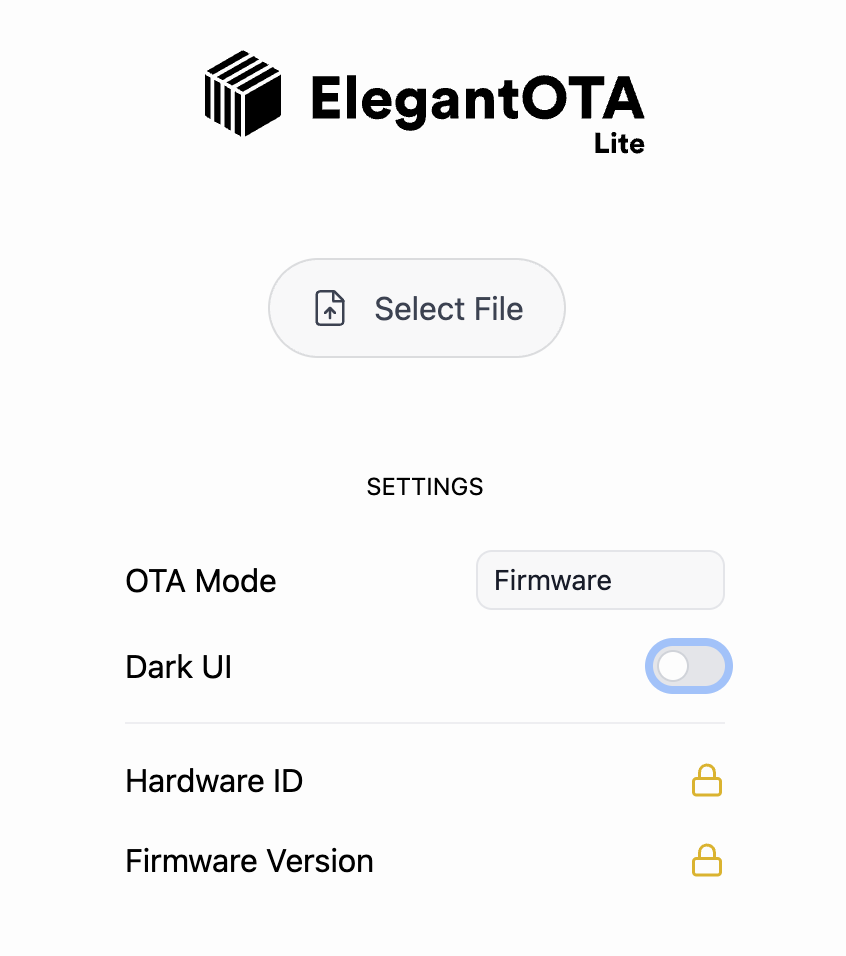
Update the firmware
It is always recommended to update the firmware to the latest version.
Download the latest version on your mobile phone or computer, then connect to each device on their WiFi access point.
Then go to http://192.168.4.1/update and upload the firmware.
The device will automatically reboot after the upload.
Configuration reset, backup and restore
If you need to backup, restore or reset the configuration to factory settings, go to http://192.168.4.1/config and click on the corresponding button.
The same page can be used to change your configuration and some more advanced settings.
Factory reset
To do a factory reset, proceed with the Firmware flash (first time) step.
Debugging and logging
The Web Console can be opened at http://192.168.4.1/console.
To see more verbose logging including the modem AT commands, you can activate the debug_enable switch in the configuration page.
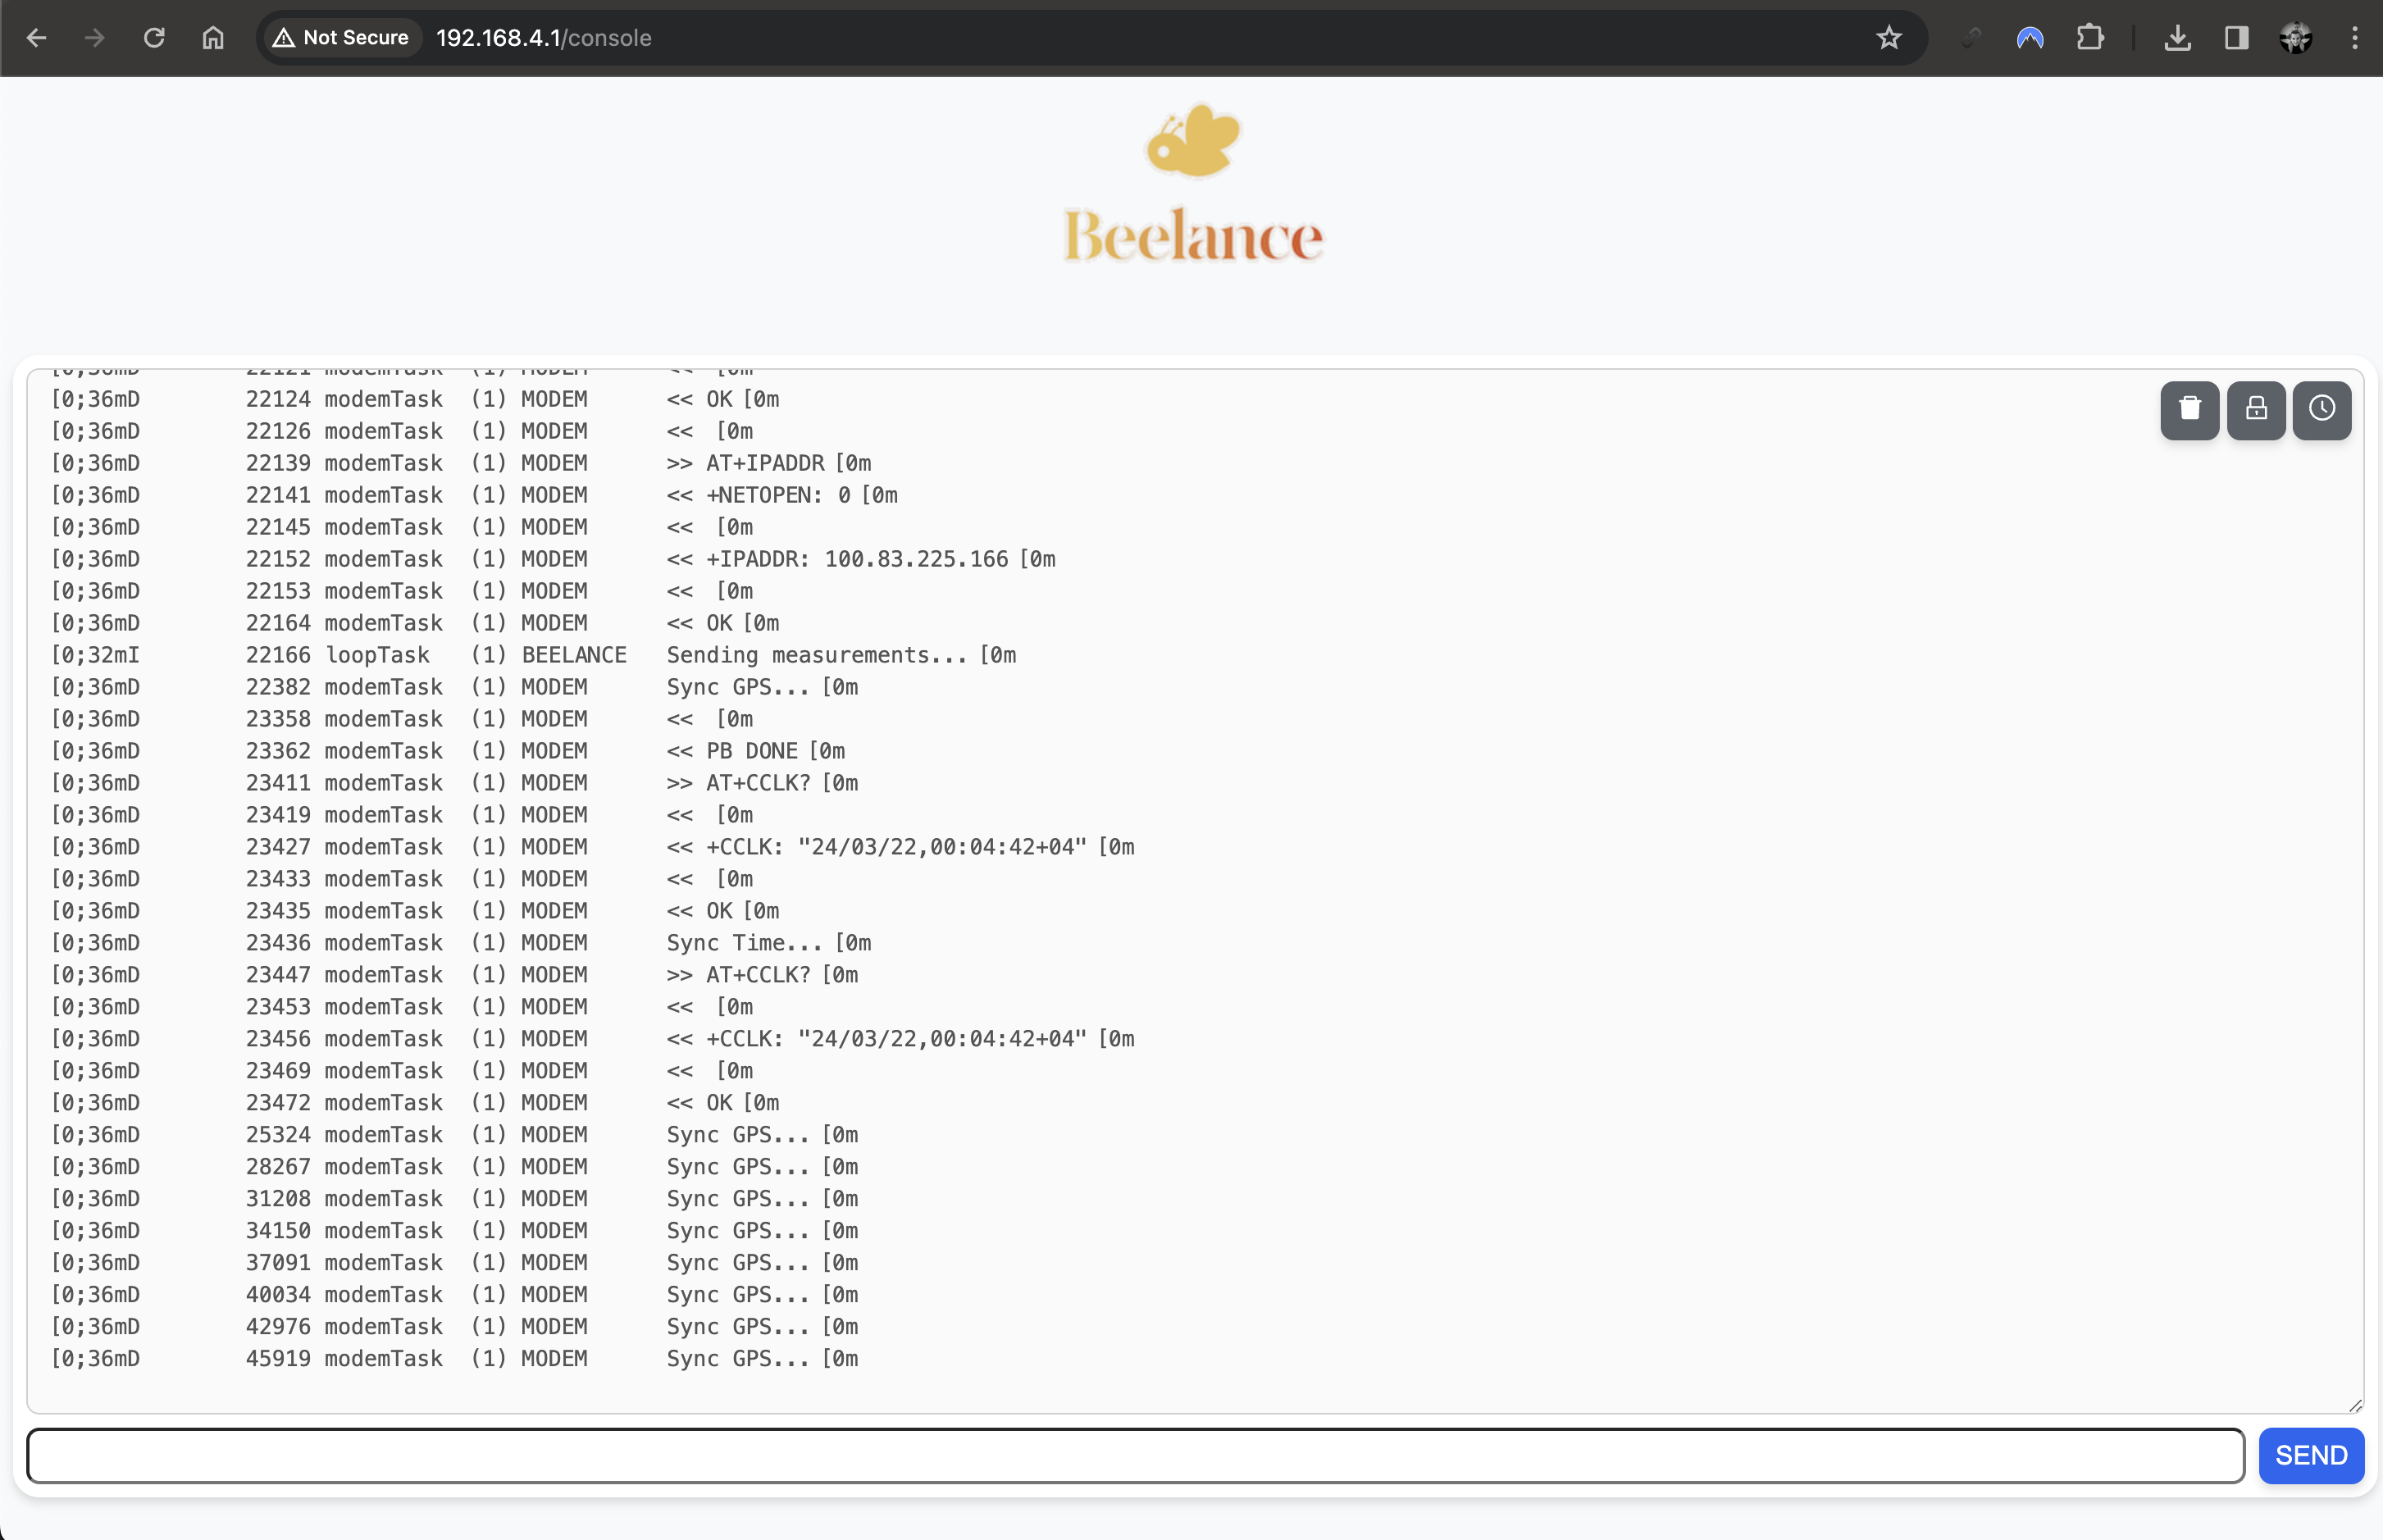
WARNING: the console allows you to interact with the Modem internals (called AT commands).
DO NOT SEND ANY DATA UNLESS YOU KNOW WHAT YOU ARE DOING.
Developer guide
Recommended IDE: Visual Studio Code with the PlatformIO extension.
Project structure
.github: CI/CD workflowsdata: Build components added to the firmwaredocs: Documentation and websiteinclude: Firmware include codelib: Firmware librariespio: pio scriptssrc: Firmware source codeplatformio.ini: PlatformIO configuration
Building and uploading the firmware
pio run -t build -e <env>
pio run -t upload -e <env>
pio run -t monitor -e <env>
Contact
If you have any question related to the project, please use the project’s discussion forum. I won’t answer any project-related question by email.
To report any bug or request a feature, please use the project’s issue tracker. I won’t answer any project-related bug or feature by email.
If you want to contact me for a partnership or schedule an assembly session, please send an email to beelance@carbou.me.
If you would like to buy a pre-assembled box (optionally setup with IFTTT and Google Sheet), please send an email to beelance@carbou.me.
But I strongly suggest you to build it yourself.
Since I do not maintain any stock and don’t have a way to cut cost, building a box for you will be 1.5-2x more expensive than doing it yourself.
Sponsors and partners

Related projects, guides and articles
- The Internet of Bees: Adding Sensors to Monitor Hive Health
- Balance Pour Surveiller Le Poids Des Ruches Pour Moins De 150€
- Beehive project issue
- Balance de ruche à 30€ : épisode 1 - Fabrication du capteur
- Balance de ruche à 30€ : épisode 2 - L’électronique
- Balance de ruche à 30€ : épisode 3 - L’étalonnage
- Balance de ruche à 30€ : épisode 4 - Le programme
- Arduino Bathroom Scale With 50 Kg Load Cells and HX711 Amplifier